Improve Fast In Go

© Milton N. Bradley 2008


Chapter 7 - A Sampling Of Major Fighting Scenarios


What we’ve done in this book thus far is to explain how to:
   - Identify the important weak groups which should be the focus of play.
   - Use the SWOT analysis technique to develop an appropriate action plan for exploiting those weak groups.

In this chapter, we illustrate a select few of the more important of those action plans.

As noted earlier, the first step in attacking a weak group will usually be a threat to enclose, because only enclosed groups can be killed. That threat will then typically elicit a response in which the target group attempts to flee, usually either into the open center or toward friendly stones. Our focus in this final chapter is on the methods for taking best advantage of that flight.

In most cases the attacker’s only reasonable expectation should be that the attacked stones will succeed in escaping, so that any profit resulting from the attack will typically be realized elsewhere (usually, but not always, nearby). Consequently, all-out attempts to surround and kill will usually not only prove futile but unproductive as well. (Of course if the defender errs and the opportunity for a kill or other major coup does present itself, it should be seized, with alacrity and thanks!)

Capping

This is the commonest and most basic attacking technique - most often appropriate, but (as we show below) not always!


Figure 1 In this 2004 AGA-Ing Pro Cup match between Huiren Yang 1P (White) and Mingjiu Jiang 7P (Black), B31 has capped White’s weak 3- stone W12-20 group, blocking its easy path into the center.

Although Black has no reasonable expectation of killing these stones, this is nevertheless the best way to exploit their weakness, aiming to profit elsewhere by harassing them.


Figure 2 This is how the game actually continued. (The details of the complex tactics involved are far beyond our present interest, and so will not be discussed here.)

White resigned after B159 because the impenetrable Black lower center moyo is just too large for White to overcome.


Figure 3 in this 2005 North American Masters match between Jie Li 9D (White) and Thomas Hsiang 7D (Black), Black has just erred with B81. Instead, he should have secured his large weak group via the one point skip to “a”.

Now White can exploit this oversight - but how?


Diagram 1 Capping with W1 seems like the logical move, but here it’s not best because it leads to a Ko which might involve dangerous complications.

Instead, 9D Li thought through those complications, and came up with an even better idea.


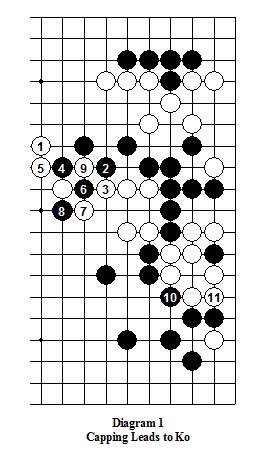
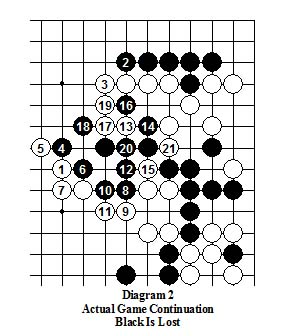
  Diagram 2 Instead of capping, the diagonal move of W1 here is even better, because it precludes that Ko possibility.

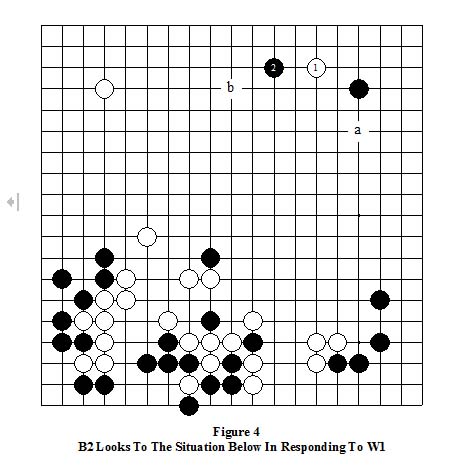
Next, Black thought it prudent to strengthen (and expand) his corner with B2 before answering W1.

Unfortunately that turned out badly because B2 induced W3, which then contributed importantly to White’s attack on the weak Black group below.

After the B2, W3 exchange, Black had time to attach with B4, and at that point he must have believed that he was going to survive White’s attack relatively unscathed.

But that expectation was dashed when the peep of W13 and the following W15 set up the later cut of W21, trapping the 8 Blacks on the right and leaving the rest of the big weak Black group fleeing with only 1 eye.

Only a few moves later Black was forced to resign.


Diagram 3 In this 2006 Paris Open Championship Tournament game between Motoki Noguchi 7P (White) and Fan Hui 2P (Black), B79 (B1 here) was played to make it difficult for White’s two marked stones to safely connect to his friendly stones in the upper left.

This put the onus on White to either break through Black’s encirclement - highly unlikely in this position - or to make life in this immediate area in the face of Black’s surrounding strength.


Diagram 4 As this game developed, instead of trying too hard to enclose and kill the weak White center group, Black instead wisely chose to make profit at the top without unduly strengthening the target group. This succeeded so well that White resigned before the weak group’s ultimate fate could even be decided!

This was superb strategy, and exemplifies how such an exploitation should ideally be carried out.


Diagram 5 In this game between a 2D and 3D, Black has suffered a huge loss of 8 stones in the lower left, so his only possible chance to win is if he can somehow mange to kill the large still eyeless marked White group in the upper center.

Since this group’s only realistic chance to connect with friendly stones is with the Whites in the lower right, the attachment of B1 is a fine (and typical) way for Black to try to prevent that connection. Although that strategy didn’t succeed in this game, it in no way detracts from the general principle involved.


Diagram 6 In this game between two 4D’s, when W1 invades Black’s thin lower right position, with White’s strength on both the bottom left and right side to run to, it would seem that this stone is not only quite safe, but actually may be stronger than the lone Black to its left as well.

But is it really? Black’s clever response gives the answer.


Diagram 7 After the twin kikashis of B2 and 4 followed by the attachment of B6, the lone White stone has now become weak and can only run straight up into the center, where Black is already strong.

The price that Black has had to pay for this is that W3 and 5 have given White a considerable profit on the right, but if Black’s following center attack succeeds (as it did in this game), his compensation there will more than make up for that loss.

So this strategy is inherently dangerous, but can be very effective if adequately followed up.


The Steering Attack

Unlike the Cap, which typically offers the capped player several options in response, a properly placed steering attack stone essentially constrains the opponent to running in a single desired direction.


Diagram 8 In this game between two 4D’s, White’s large weak center group offers Black an ideal opportunity to begin the creation of a large Moyo in Sente by forcing White to move in a desired direction.

Do you see how?


Diagram 9 B1 blocks White’s progress to the right, forcing his group to flee up into the open top, allowing B3 to begin sketching out a large moyo on the right side. Although this area is still much too large and open to all become territory, it does provide Black with considerable potential. How much of that potential territory can later be realized as solid territory is, of course, still to be determined in subsequent play, but it does provide Black with a significant winning chance.


Diagram 10 In this position from a game between two 5D’s, Black has set White up for the devastating splitting attack of B1, which is also on the key shape point of the lower White group.


Diagram 11 The choice and timing of the best splitting point and the ultimate outcome of the resulting fight are both a function of the opponents’ skills, but unless gross blunders occur the end result should more often than not be favorable to the attacking player.


The Running Battle

Now let’s look at the early stages of a game contested between an 8D and a 7D involving a classic running battle, in which, for many moves, almost every move can be explained by the Sector Line concept!

It’s my bet that, just by using this simple concept, you will not only be able to come close to predicting these strong players moves surprisingly often, but also would probably not have made the overplay of W15 in Dia 13 that ultimately cost 8D White this game!


Figure 4 In this position W1 is the most logical (but hardly the only) way for White to play, making the fullest possible use of his upper left 4-4 point stone by making a long strategic extension from it.

A squeeze play is the best way for Black to answer because Black is concerned with neutralizing White’s center thickness below, and B2 is the strongest and most aggressive pincer available.

Perhaps most important, it encloses W1 tightly within Black Sector Lines, so it’s Sente!

If instead Black were to passively extend at “a” to coordinate with his strong position in the lower right, W“b” would work much too well with both the White upper left star point stone and his thickness below for Black to allow.


  Diagram 12 If W3 now dives into the 3-3 point to seize the corner as shown here, this Joseki will inevitably follow, and that would leave Black with both thickness which helps neutralize White’s thickness below, and Sente with which to play at either “a” or “b”in the upper left corner, again with a result White felt was unfavorable to him. So instead ...


Diagram 13 The one point center skip of W3 to break the Black Sector Line was necessary if White didn’t want to become enclosed, and that was the first key move in his strategy.

It also enclosed both the Black corner stone and B2 in White’s own fairly distant Sector Lines.

Most important, it was Sente because a following move at 4 would force Black into a low, nearly enclosed position in the upper right corner. So...


B4 Prevents White’s good play at this same point and breaks the White Sector Line, while increasing Black’s space. But it’s Gote because it doesn’t establish a Sector Line of Black’s own.

W5 Since Black has no enclosing move next, White is free to try to establish some eyespace, and this “slide” threatens to follow at 6 (the 3-3 point), to both steal the corner territory and provide the White stones with almost certain life.

So it retains Sente.

B6 Prevents White’s play on the key 3-3 point and so retains most of the corner territory. This assures Black of almost certain life, and equally important, keeps the White stones unsettled!

But despite those wonderful assets it’s Gote, so White is again free to pursue his own objectives.

W7 This is the second key move in White’s strategy, so it’s important that you thoroughly understand its rationale! What he intends to do is to counter Black’s strategy of negating the value of White’s center thickness below by building a compensating White moyo in the upper left!

At least equally important, this stone prevents B2 from extending to the left to make eyespace, retains Sente by enclosing B2 in a White Sector Line, and also threatens to capture it by continuing with W”c”! (Pretty good for a single move!)

B8 This is close to being the only logical response because B2 has no base, and attaching to W7 at “a” would only induce W“b”, B“c” to strengthen W7 in Sente and thus play into White’s moyo strategy. B“c” instead would not only be too slow in moving out into the center, but would also not threaten White in any substantive way.

In sharp contrast, B8 breaks White’s Sector Line and establishes one of Black’s own which encloses W1-5, while also threatening to follow with B“d” to lock those White stones in.

So B8 seizes Sente, and begins a classic running battle in which each side has a weak group in potential danger.

  Diagram 14 Becoming enclosed would force the White stones to either live small in Gote or die, so escaping is essential.

This one point skip of W9 is the best way to do that, because it retains Sente by threatening to continue at 10, which would force Black into a low position on the right edge.

B10 Prevents White’s good move at this same point and increases Black’s potential right side territory, while aiming toward making that territory really huge if he can further coordinate it with his strong lower right corner.

But despite that it’s Gote because it makes no serious enclosure threat against the W1-9 group. (W9 already broke what would have been Black’s new Sector Line.)

W11 Because the W9 group can’t be enclosed immediately, White can afford to use his Sente to play here because it encloses B2-8 within a new White Sector Line, while threatening to continue with W“a” to lock-in those two Black stones and almost certainly kill them.

This is a fine double purpose move, because it also coordinates with White’s upper left corner stone, beginning to construct the large White moyo in that area White was aiming at when he played W7.

B12 Black must break out of the new White Sector Line, and this is the best way to accomplish that because it in turn puts the W1-9 stones within Black’s own new Sector Line, and threatens to continue with B“b” to enclose him. So Black once again has Sente.

W13 Even if White allows B“b”, after W“c” it would still be possible for his enclosed group to live, but that scenario would be bad for him. So he has no real choice but to skip out to break the Black Sector Line thus.

Although W13 actually encloses the weak B2-12 group within a new White Sector Line, it’s one with a very distant (and therefore not very threatening) anchor point, so Black is really free to continue as he wishes.


  Diagram 15 B“a” now to further expand his right side is both large and feasible, but then W14 will follow and that would be bad (although not disastrous) for the weak Black 3 stone string of one point skips! So instead ...

B14 offers the weak Black string the most future alternatives, so it’s safest.

But either B“c” or 15 is also feasible, with the choice between these options more a matter of the player’s judgment than of necessity.

W15 was the key turning point in this part of the game! Unfortunately, it was somewhat overambitious, despite being the most consistent with White’s moyo strategy in playing W7 and 11. It mistakenly emphasized the creation of White’s potential upper left moyo over the safety of his weak stones on the right, and thereby violated the earlier noted key principle of: “Urgent Moves Before Big Moves”.


Instead, W“a”, “b” or 16 to strengthen his weak group were preferable alternatives, and, as with B14, the choice between them would be a matter of the player’s best judgment rather than of necessity.

Because W15 yielded Sente to Black in the running battle it was also the riskiest choice, although one it seems that White undertook willingly because he lusted after the big moyo he was trying to create on the left, and as an 8D he undoubtedly had absolute confidence that his tactical ability would suffice to rescue him from any resulting difficulties on the right. But even as strong a player as he would almost certainly have been better advised to play one of the other, safer choices noted above.

B16 Because the Black string isn’t enclosed or even nearly so, Black is now free to be aggressive.

Seizing the opportunity offered by White’s failure to reinforce the weak White group, this important play once again encloses those stones within Black’s Sector Lines, and forces a response.

W17 Breaks the new Black Sector Line, but still leaves the White group within a more distant Black Sector Line anchored in the lower right corner, and that’s a measure of the size of White’s error in playing W15.

B18 Reestablishes the more dangerous close Sector Line, and continues to force White’s response.

W19 Not only breaks both of Black sector Lines, but also gives White access to some badly needed potential eyespace on the right edge. Equally important, it also threatens to play at 20 next, occupying the key pivot point in the corner. That would not only increase White’s own eyespace while reducing Black’s, but would also actually threaten the life of the Black corner because of its weaknesses at “d” and “e”.

Because that would be too good to allow ...

B20 This is now the key move, stabilizing the Black corner stones and destabilizing White’s, which are now no longer certain of making 2 eyes!

What happened next to the weak White stones will not be shown because it’s entirely tactical and therefore outside the scope of our interest in the basic Sector Line/connectivity/enclosure themes we’re discussing. But it may be illuminating to note that despite 8D White’s exceptional tactical prowess he wasn’t able to make 2 eyes locally, and in the process of attempting to achieve life or break out of Black’s enclosure he overstepped the time limit and lost the game! A classic example of the difficulties that can follow from ignoring the indications provided by Sector Lines!


Click Here To Go To
Chapter 7 Problems

Click Here To Move On To Epilogue

Click Here To Return To Table Of Contents

Click Here To Return To Milt's Go Page

Click Here To Email Your Comments/Suggestions To Milton N. Bradley