The Magic Of Go
© 2002 Milton N. Bradley
Although the characteristic which places Go on a unique plane far above competitors like chess is its almost unbelievably profound strategy, it is the clever, incisive tactics of Go that are the most obvious and accessible feature which provides much of its appeal.
As in chess, perhaps the most startling and frequently unexpected of Go's extensive catalog of clever tactical ploys is the sacrifice, so this will be the focus of many of the few selected examples presented here.
Unlike chess, in which many of the best problems can be shown to be impossible to achieve in a
real game, EVERY GO PROBLEM IS COMPLETELY REALISTIC and the vast majority of the
best ones have actually occurred in master games!
Problem 1 Problem 2 Problem 3 Problem 4 Problem 5 Problem 6 Problem 7 Problem 8 Problem 9 Problem 10
The examples presented here provide only a tiny insight into the beautiful and challenging world of Go problems. For a vastly greater and more advanced selection, please refer to the section entitled "Problems" in the wonderful The Web Go Page Index
After you've had your fill of those brain twisters (at least for the moment) please don't forget to
return here for the remainder of my presentation!
Continue
Click Here To Return To Milt's Go Page
Problem 1
- Black To Play And Live
Click here to see the Solution And Explanation
Problem 2
- Black To Play And Kill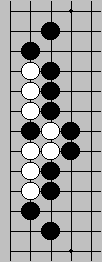
Click here to see the Solution And Explanation
Problem 3
- White to play and kill the Black upper left corner.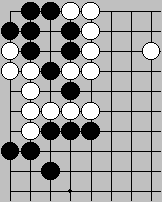
Click here to see the Solution And Explanation
Problem 4
- White to play and live in the upper left corner.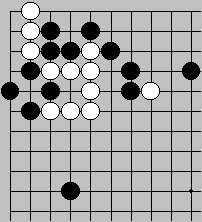
Click here to see the Solution and Explanation
Problem 5
- Black to play and live despite the fact that the marked White stone has just been played on his key point!
Click here to see the Solution And Explanation
Problem 6
- Black to Play For Ko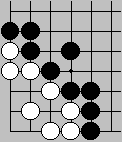
Click here to see the Solution And Explanation
Problem 7
- Black To Play And Live (Despite the fact that the marked White stone has just been played.)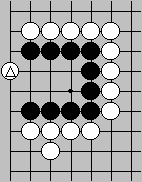
Click here to see the Solution And Explanation
Problem 8
- Black To Play And Kill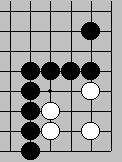
Here, The white stones have excellent shape and a solid root in the corner,
so killing them can only be achieved via the most precise play.
Click here to see the Solution And Explanation
Problem 9
- Black To Play And Live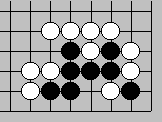
Click here to see the Solution And Explanation
Problem 10
- Black to Play And Kill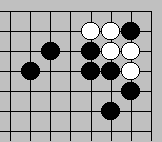
Click here to see the Solution And Explanation
Problem 1 Solution
 The "rule of thumb" which applies here is "in a symmetrical position, play
at the middle", and with B1 the life of the Black group is assured!
The "rule of thumb" which applies here is "in a symmetrical position, play
at the middle", and with B1 the life of the Black group is assured!
If W2 attempts to narrow Black's eyespace B3 blocks while forming one eye. Then W4 and B5 repeat the procedure on the other side, giving Black the 2 separate and distinct eyes needed for life and safety.
By symmetry, W2 and 4 may be played in either order.
Of course, in a game between experienced players, none of this will occur (except as Ko threats and responses) until the late endgame, since both sides can clearly see that after B1 it is impossible for White to kill directly.
Please note that whether or not the point "a" is filled (by either side) makes absolutely no
difference to the life or death of these stones! Finally, after B5 White can only defend one or the
other of W2 and 4, so Black is almost certain to be able to capture one of them.
Next Problem
Click here to Return To The Magic Of Go
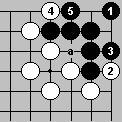
Problem 2 Solution
 B1 is the key initial play, on White's eye-making point (if White plays here
instead, he has 3 eyes and is alive!).
B1 is the key initial play, on White's eye-making point (if White plays here
instead, he has 3 eyes and is alive!).
Since the position is symmetrical, it makes no difference if W2 is played as shown or at 5.
Because W2 threatens to continue at 3, not only making one eye but with atari on the 2 Blacks as well, the additional sacrifice of B3 to prevent this is necessary.
W4 is not only atari on the 3 Blacks, but also threatens to continue at 5 to form an eye as well, so B5 to prevent this is essential.
(Note that if W4 is played at 5 instead, B5 at 4 also kills! Please work this variation out for yourself.)
Finally, W6 could be played to capture the 3 trapped Blacks but this would not save him because 3 stones in an "L" is a "dead shape", so B7 would be played back "beneath the stones" at 1 to reduce White to one eye. Therefore the White formation here is simply "dead as it stands"...... except that there is still a spark of life remaining! Do you see why?
The only chance for life is if White captures the 3 Blacks as a Ko Threat which Black cannot afford to answer here. Then, White will be the one who can play "beneath the stones" at the point of 1 to form his 2 eyes after all!
From this analysis, the alert reader may realize that in an actual game between two competent
players in this situation no further moves would be made directly after B1, because White would
"read" out the diagramed sequence mentally and recognize that it failed. So, in practice, ALL of
the diagramed moves would be made ONLY as Ko Threats and responses thereto! (If and when
such a remote Ko came into existence.)
Next Problem Prior Problem
Click here to Return To The Magic Of Go
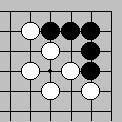
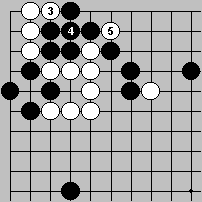
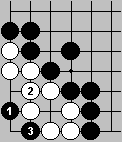
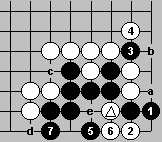
Problem 3 Solution
The Black corner group already has one secure eye at "a", but in order for it to secure the second real eye needed to ensure its absolute safety (here, at "b"), Black would have to play on the point now occupied by the marked White stone.
By playing the marked sacrifice stone on this key point himself,
White has converted the point "b" into a FALSE EYE, and
because the Black group cannot escape it is now DEAD AS IT
STANDS. Because these Black stones still have liberties they will
remain on the board until both sides have passed and the game is
over, but then White will simply remove all of them as his
prisoners without further play!
Prior Next
Click here to Return To The Magic Of Go
Problem 4 Solution

W1 is the key sacrifice, giving atari to 3 Black stones.
At this point a competent Black would abandon these stones, because further resistance is futile!
If Black foolishly continues with B2 as shown to capture W1 (and remove it from the board), W3 is again atari on the same 3 Blacks.
If B4 then mistakenly connects, after the inescapable atari of W5 he has lost 6 stones instead of only 3, but since he has captured W1 his true net loss is "only" 5 stones. With either scenario White is assured of his necessary 2 eyes, and life in the corner.
This position arose in an actual game between two professional Go masters, played on the Internet Go Server (IGS) in Feb 1997, but with Black to move instead of White! So, of course, the opportunity for White to play this sacrificial sequence never occurred because Black foresaw it and wisely played on the point to the right of W5 to prevent it!
This sort of prophylactic play is quite common at the higher levels, and as a consequence most
(but far from all) of the spectacular tactical ploys in Go occur only in the minds of the players,
and not on the board!
Prior Next
Click here to Return To The Magic Of Go
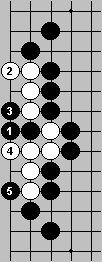
Problem 5 Solution
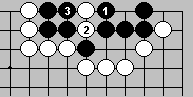
B1 makes one eye, and then W2 gives atari to one Black.
B3 captures 2 White stones, and then W4 plays back on the point just vacated by W2 ("beneath the stones") to again atari the lone Black stone.
Next, if B5 is mistakenly played at the point of 6 to capture W4, the atari of W5 kills Black because the eye at 4 is false!
So the only feasible response is the connection of B5 as shown, allowing W6 to capture 4 Blacks!
But now it is Black who gets to make the play "beneath the stones" with B7, giving an inescapable atari to W4, 6 and thereby assuring Black's second eye with their capture!
The secret to success in such situations, of course, is not only being able to visualize the entire sequence beforehand, but also in not being greedy and attempting to save the 4 Black stones.
(Although I have characterized this as an "advanced" problem because it involved both sides
playing "beneath the stones", to a strong Go player it is really quite simple and many more
difficult situations are routinely encountered on a daily basis.)
Prior Next
Click here to Return To The Magic Of Go
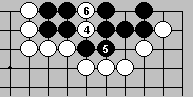
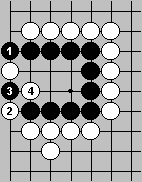
Problem 6 Solution
 B1 is the key point, and after this White cannot avoid the Ko.
W2 is forced! If this stone is mistakenly played at 3 to form an eye, the clever "throw in" sacrifice of B3 at 2 sets up a SNAPBACK which captures 4 stones and kills the entire White group outright!
If W2 correctly connects as shown, then the atari of B3 sets up a Ko in the
corner when W4 makes its forced capture. This is a "flower viewing" Ko for
Black because it has cost him nothing if he loses it (and even then he will
almost certainly profit elsewhere as a result of the Ko threat which White
can't afford to answer), while White risks his entire corner here (worth over 20 points!).
Prior Next
Click here to Return To The Magic Of Go
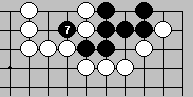
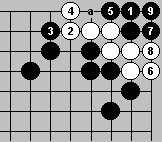
Problem 7 Solution
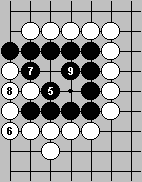 B1 is the only way to begin, but then W2 establishes a connection to his stones below, and it looks bad for Black!
But B3 is a clever sacrifice which gives atari to both Whites, so W4 MUST capture it.
Next, B5 threatens to continue at 7 with a double atari, so White MUST connect at either 6 or 8.
Then when B7 gives atari W must make the other connection, because allowing the capture would not only give Black his needed 2 eyes but some prisoners as well.
Finally, B9 forms the needed 2 eyes to give Black life and safety.
Prior Next
Click here to return to The Magic Of Go
Problem 8 Solution
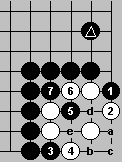 The solution to this problem is provided by the Japanese Go proverb "There
is death in the Hane".
The solution to this problem is provided by the Japanese Go proverb "There
is death in the Hane".
B1 is the first Hane, narrowing White's eyespace and threatening to continue at "a".
W2 is atari on B1, while also preventing the killing B"a".
Because of the presence of the marked Black stone, White cannot escape even if he captures B1, so B3 ignores the atari to make a second Hane on the other side, threatening to continue at "b".
This time W4 isn't an atari so Black has time for the clever placement of B5, but with W4 White is now assured of one eye in the corner..
Since B5 threatens to connect out at 6 to kill White's second eye, W6 is forced, but then....
B7 is atari on two separate White 2-stone units, assuring the capture of one or the other of them.
After this, W"c" seems to make 2 eyes after all, but is really futile because after Black captures 2
Whites via B"d" or B"e", either W2 or W4 will eventually be put in atari, so the needed eye at
either "a" or "b" will be false and White is dead!
Prior Next
Click here to Return To The Magic Of Go
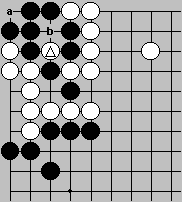
Problem 9 Solution
 B1 not only prevents a White atari at this same point while practically
assuring the capture of the marked White stone, but also prepares to
make an eye in the corner by continuing at 2, so...
B1 not only prevents a White atari at this same point while practically
assuring the capture of the marked White stone, but also prepares to
make an eye in the corner by continuing at 2, so...
W2 is a sacrifice on the key point to prevent the Black eye.
Next, B3 is a clever counter-sacrifice which does 2 key things:
By threatening to capture the 2 Whites below, it forces W4 to assure its own capture; and until B3 IS captured White can't give atari at "a" to the 2 Blacks because it would be a self-atari!
This gives Black time to play B5, which threatens to continue at 6 to capture 2 Whites separately and make Black's needed 2 eyes, so....
W6 is yet another sacrifice to prevent this, allowing
B7, which makes an eye and assures Black's life. Why? Because with "c" still open W"d" can be
met by B"e" to atari and assure the capture of the 3 Whites and make Black's second eye!
Prior Next
Click here to Return To The Magic Of Go
Problem 10 Solution
 The key to the solution is the sacrifice of B1 to prevent White's own
play on this key eyemaking point.
The key to the solution is the sacrifice of B1 to prevent White's own
play on this key eyemaking point.
W2 desperately tries to enlarge his eyespace, so the block of B3 is essential to contain this.
W4 threatens to continue at 5 to form one eye and assure the capture of 2 Blacks to assure the second, so....
The additional sacrifice of B5 to prevent this is necessary.
Next, W6 again threatens to make an eye by continuing at 7, so yet another sacrifice via B7 on this new key point is necessary.
Next W8 threatens to continue at "a" to assure the capture of 4 Blacks with a "live shape" for White, so...
Yet another sacrifice via B9 is necessary to assure the death of the White group because now
W"a" would capture 5 Blacks in a "dead shape". Why? Because after W"a"' captures the 5
Blacks, a final Black sacrifice "beneath the stones" at 1 reduces White to 1 eye and kills.
Prior Click here to Return To The Magic Of Go
Click Here To Return To Milt's Go
Page