Improve Fast In Go

© Milton N. Bradley 2008


Chapter 1 - The Role Of Fighting In Go


The financial investment model is an appropriate, if rather grossly simplified, way to grasp the essence of a Go game. Think of the stones you play as your investment capital, and the resulting territory you acquire as the return on that investment. It’s well established that a prudent financial strategy invariably requires a judicious balance between long and short term investments. It’s much the same in a Go game, where the balance that must be struck is between profit (short term) and such relative intangibles as thickness and attack (long term). In this balancing process, it’s often feasible to cede even a large temporary lead in solid profit to the opponent, in the expectation of later recouping. But whatever the chosen strategic mix in any given game, at game’s end the sole determinant of victory or defeat is the amount of empty board space controlled by each side.

Capturing more stones than the opponent, or even capturing any opposing stones at all, is essentially irrelevant except as it contributes toward that goal.

Given that fact, it might seem that victory should be achievable through the simple walling off of areas by both sides. But that’s not true! Even if that primitive strategy (pejoratively termed “ground gaining Go”) could be successfully followed initially, the finite size of the Go board coupled with the fact that both sides are seeking to gain control of the same limited amount of space means that conflict is ultimately inevitable. And that’s especially true when one side or the other realizes it has fallen behind in acquiring territory and can only recoup by “stealing” a portion of what the opponent has claimed. So in well played Go games the confrontations usually begin early, and then are almost invariably crucial in determining the final outcome.

As a result, perhaps the major key to making appropriate strategic decisions lies in understanding that:


Go Is A Fighting Game


This should distinctly not be interpreted as implying that fighting is all there is to Go, because nothing could be further from the truth. Rather, fighting is perhaps best understood as the essence around which all of the many subtleties and complexities of Go tactics and strategy coalesce to produce the wonderful game which has intrigued humanity for millennia.

The Basic Principles Of Fighting

 
The Life Or Death Of Groups
Is The Central Issue In Fighting


Although most high level Go games are decided as a result of fights, those fights are anything but random, mindless conflict for its own sake! Quite the contrary. Fights between competent opponents occur only because both sides are unavoidably competing for control of the limited assets of space, shape and connectivity available on the 361 intersection Go board.


Only Fights Involving Important Groups
Are Likely To Be Productive


How to identify important groups is the subject of Chapter 2.


Only Fights Against Weak Groups
Are Likely To Be Successful


How to identify weak groups and determine when and why they are vulnerable is the subject of Chapters 3 and 4.

When attacking vulnerable groups is most likely to be successful is the subject of Chapters 5 - 7.

Rather


Gratuitous Fights For Their Own Sake
Are Almost Always A Mistake


Fight Only In Pursuit Of
Strategically Important Objectives

And Only When And To The Extent
Absolutely Necessary


Diagram 1 In this game between a 5D and a 7D, the atari of B1 on the marked White stone has forced the connection of W2, with (small) advantage to Black because B1 not only separates White and is potentially useful, but also because W2 only adds insignificantly to White’s already thick formation.

The key question now is how Black should best continue.


  Diagram 2 The exchange of the atari of B1 for W2 on the left has created useful Aji for Black to exploit at the proper moment, but continuing there immediately to support/utilize the 2 Black stones would only prematurely start a fight that would almost certainly be to Black’s detriment!

As things stand, Black’s absolutely essential play is B3!

This begins to sketch out a Black corner in the lower right while partially neutralizing the White thickness, and also prevents the excellent extension/kakari of W“a”, and leaves the decision regarding what to do with the 2 Black stones on the left for later. (In the actual game, the proper moment to support those stones never arrived!)


Diagram 3 In this game between two 7 D’s, White has retained Sente, so it’s his choice as to how to proceed from this point forward.

Invading the wide extension between B1 and B21 seems inviting. But is it really? And if it’s not, what would be better? And why?


Diagram 4 This is the sort of position in which it’s tempting to start a fight by invading with W2! Although that might conceivably succeed, the 7D who played White in this game thought better of it. He instead opted for this calm development, which had the advantage of taking no unnecessary risks. Its detriment is that it yielded him only a minuscule overall plus.

Caution! There is sometimes no reasonable alternative to initiating a fight when you’ve fallen behind, and less aggressive play is unlikely to reverse the game’s losing trend! But other than in such exceptional circumstances, avoiding gratuitous and/or potentially dangerous fights is usually sound policy.

How to Distinguish between vital fights and those that aren’t is one of the major subjects of this book, so, hopefully, that important distinction will be much clearer after you’ve read it all.


Fighting Guidelines: In a fencing bout, every legal touch has the same value. So when the opponent thrusts, a fencer’s first response must be to parry! Only then does it become feasible to initiate an aggressive counter action. In a boxing match, every legal blow has the same point value to the judges, but more effective blows can not only steal the initiative from the opponent but can also serve to wear him down so that both his attack and defense become less effective. Equally important, they can also serve to instantly end the bout via a knockout!

And it’s much the same in Go. A move by the opponent which intends to seize Sente by making a threat that you can’t afford to ignore may be defended against as expected, but it also may be ignored in favor of a threat of one’s own which is in fact more serious. In each case, deciding what’s appropriate strategically and then achieving their desires requires accurate positional appraisal followed by precise execution by both sides, so in the final analysis a player’s arsenal of tactical skills is the foundation upon which his strategy is both built and realized.

The crucial factor in the conduct of any fight is the realization that each separate group of both White and Black stones must somehow form at least two separate and distinct eyes by the end of the game, to both remain alive and garner the territory that will count toward a win. So the more separate groups you can force your opponent to establish, the more “free” moves you gain with which to pursue your own objectives. This is generally true because most moves made by the opponent to secure his own eyes won’t also expand his space or attack your positions!

Because it’s easy for a beginner or intermediate in a handicap game to be intimidated by White’s superior skill, it’s also important to remember that


The White Stones Have No Special Powers,
And Share The Same Need
For Eyeshape, Space, and Connectivity
As Black’s


So Black must carefully appraise and then seek to exploit any weaknesses in White’s positions, rather than reflexively playing purely defensively as though the White stones were somehow invulnerable!

The following principles provide excellent guidance in most situations. Why they’re generally valid will become clearer when we discuss strong and weak stones in Chapter 3.


To Attack, Play Away.

(Keep a discreet distance, inhibiting the opponent’s
ability to expand and/or form eyes.)


The Nature Of Attack

An attack uses threats against weak stones to create gains, either locally or elsewhere, which typically take the form of territory (profit), the creation of power/influence, or an attack on another group.

Attacking plays will usually elicit a response, but won’t necessarily result in an immediate fight.

Attacking scenarios are of almost transcendent importance in playing Go and among the most satisfying to implement, so it will be worth our while to briefly examine their structure and implications here, deferring fuller discussion for later.

In a 2008 article in the AGA e-journal, well known American Go teacher Jim Kerwin, 1P, said the following:

“The key to attacking is to start by choosing where and what you want to gain. You will find it difficult at first to see a possible gain and how to use attack to get it. The good news is that if you can’t see how to use the weak group to get what you want, you can afford to wait. The worst case is that the opponent will eventually spend a move to reinforce the group allowing you to play a profit move, so you’re guaranteed something.”

This is splendid advice, as might be expected from a Go professional, but I believe that it’s still amenable to modest refinement for the beginners/intermediates who are endeavoring to learn from this book.

The relevant issue is the player’s meta-strategy for playing Go in any particular game. When engaged in competition in which winning and rating are the motivation, Kerwin’s conservative strategy of staying within the confines of the player’s current knowledge/skill base except in desperate circumstances is clearly appropriate. But in playing “casual” Go, especially when expanding your experience base is the dominant motivation, a far more adventurous and aggressive strategy will usually be more appropriate!

Given that such “casual” games will almost necessarily constitute by far the majority of your early playing experience, rather than holding back unless you’re reasonably certain of success as Kerwin suggests, in those games your preferred strategy should be to assess as best you can, and then, if in your best judgment it seems at all feasible, attack! Then, especially if you later review what happened (or use a service like The Go Teaching Ladder to have a much stronger player point out your errors), by learning from your mistakes you can maximize your rate of progress.


To Defend, Play Close

(Make contact as a method for creating eyeshape
and/or sealing off eyespace.)


Contact plays will almost invariably result in an immediate fight.

In any event


Before You Play Defensively,
Always Seek An Offensive Move
That Also Satisfies Your Objectives


FIGHTING CONTINUES UNTIL BOTH SIDES
ARE (at least temporarily) STABLE


This may mean that both sides are safe, that one side’s stones are either unequivocally dead or temporarily abandoned, or that both are still incompletely settled. In the latter cases, the fight will often resume later, when the appearance of other stones nearby makes it profitable for one side or the other.

To see how these principles work in practice, let’s examine a situation that frequently arises in both even and handicap games.

  Diagram 5 The “Knight’s Move” approach of W1 (or the symmetrical point on the upper side) is the most common way for White to begin operations against the Black 4-4 point stone.

Because it’s an attack, it doesn’t make contact with the object of that attack, but instead stays a discreet distance away!

When Black is in a position to respond aggressively, the one point squeeze play of B2 is the strongest counterattack, also playing at a discreet distance from its target, and inhibiting W1's ability to expand down the side to make a base there.

Feasible but milder squeeze plays instead of B2 which may be globally preferable in some situations are “a” thru “d”, while “e” is sometimes chosen when Black feels the top and/or center are more important than the left side.

After B2, White has the choice of defending W1 immediately or playing elsewhere. (If he tenukis he will suffer a fairly serious local detriment if Black is first to play locally again, but even then W1 can’t be killed.)

How each of White’s feasible responses to B2 can play out is shown next.


  Diagram 6 In response to the pincer attack of B2, one common (but rather passive) continuation is for W3 to dive into the corner.

After the Joseki sequence thru W11 (B“a” in place of B10 is sometimes preferable), White is not only alive with profit in the corner, but is also unconfined.

In return, W1 is at least temporarily abandoned and Black has thickness. This dynamic “equality” is a fair allocation of assets for both sides for the moment, but not a fully adequate characterization of the situation.

The important aspect of this position unaddressed by that assessment is that White’s profit of about 10 points in the corner is almost (but not quite) already assured, but Black’s thickness on the outside must still be sooner or later converted into an approximately equivalent gain either locally or elsewhere for this trade to be ultimately fair.


Diagram 7 “Abandoning” W1 as in Dia 6 isn’t always globally desirable, and in that case the one point center skip of W3 here is often a good alternative to entering the corner.

After that, the calmest sequence is as shown, with White getting strong center influence in return for Black’s sketching out corner territory. (The contact play of B6 helps defend the corner territory in Sente by threatening to connect underneath to B2 by continuing at 7, thereby inducing W7 to prevent that.)

After this, with the 3-3 point (“a”) in the corner and “b”, “c”, and “d” all still available for White if and when circumstances make them appropriate, and with the skirt at “e” also still open, the big corner territory is as yet far from securely Black’s!


Diagram 8 It’s also feasible for White to switch W5 in Dia 7 to the “shoulder hit” on B2 shown here, with this common result.

B14 prevents a White enclosure, and at least tentatively assures life for the B2-14 group.

Then, depending on what’s going on elsewhere, White may play “a” immediately to assure his connectivity (the best way to do that), or tenuki and hope that he’ll be able to get back to consolidate his position here before Black can play to cut him apart.

Instead of the aggressive squeeze play of B2 in Dia 5 - 8, Black might feel it preferable to play defensively, so let’s examine next just how differently that will play out.


Diagram 9 Especially when Black already has the marked stone or one near it in place, instead of squeezing, the attachment of B2 is feasible.

As earlier noted, this is not an attack! A contact play like this B2 is actually a defensive move which is intended to enable Black to both “make shape” and take some corner/side territory.

Its main detriment is that it also induces White to make shape and territory as shown, thus simplifying the position while also reducing both side’s later options.

(There are a number of other feasible Joseki variants beyond these few which give somewhat different results, but those details are outside our present interest and so will not be discussed here.)


  Diagram 10 Relevant to this discussion is the “bang against” attachment of B2 here, which, as earlier noted and despite its appearance, is primarily an attack and not a defensive move!

Since this is something that seems inconsistent and therefore may be confusing, understanding its rationale is important.

The attachment of B2 is most appropriate when the triangled Black stone (or one at “a”) is already in place on the upper side, and is even more effective when (as here) the marked left side star-point stone is also present (as is true in high handicap games).

The aim of B2 is to make infeasible an immediate White switch to the 3-3 point in the corner at “b”, as in Dia 8. It does this because if W3 at “b”to “steal” the corner territory, B4 at 3 would give Black excellent eyeshape while severely damaging W1. So most often W3 is considered necessary.


Then B4 works perfectly, in conjunction with the triangled upper side star point stone, toward building a large Black territory in the upper left corner and adjacent upper side. (Although as noted in Dia 7, that territory is still far from completely secure, especially with W“b” still available.)

After B4 White needs eyespace for his 2 stones, but the marked Black left side star point stone stands in the way of an ideal extension, leaving only the very short one point skip to W5 as really feasible.

Next, B6 prevents a White slide to either “c” or “d” to expand his eyespace, after which W7 is necessary to create the beginnings of some eyespace and shape while fleeing toward the center. B8 is then often best, building Black’s strength and looking toward the lower side.

What’s really important here is to recognize the fundamental difference between the almost entirely defensive attachment of B2 in Dia 9 and that of Dia 10, which is primarily (but not entirely) offensive.

Once that critical difference is clearly understood, it should then be far easier for you to make the proper decisions and appropriate followup in similar situations that arise in your own games.


Whatever the situation


Don’t Act On
The First Plausible Move
That Solves Your Major Problem.


Always Look Further For A Better Move,
Especially One Which Also Accomplishes
Other Desirable Goals.


Diagram 11 This is a fairly common type of position, in which the central area to the left of the Black stones is still quite open.

In most cases, when the marked White stone probes his one point skip Black will want to maintain his connection, and the first step in finding the best way to do this is to identify the feasible alternatives.

Please decide on your own candidates before looking at the following diagrams.


Diagram 12 Black’s available connection options are marked from “a” to “d”. But which is best?

There is no one universally correct answer because the preferred option will depend upon other stones already in place (not shown here) or deemed likely to appear in subsequent play.


Diagram 13 The simplistic choice is the hard connection of B1.

Although this is the only absolutely secure, unbreakable connection, it’s also the one that creates no shape at all while offering the fewest followup alternatives.

Despite these detriments there are situations in which it’s the most desirable option, so it can’t simply be dismissed out of hand. But absent special circumstances that make the other options infeasible and/or Black’s ultra-solid thickness here particularly useful, this is usually the worst choice. So an alert Black will look further.


Diagram 14 A slightly better alternative, which in certain circumstances may be preferable to the others, is the extension of B1 here.

This maintains the connection because if W“a’, B“b”, and if then W“c” cuts, the atari of B“d”answers. And if W“e” then extends, B“f” is a Geta that traps the two White cutting stones.

But instead of pushing at “a”, which obviously doesn’t work, if the position to the left is suitable an alert White might continue with something like W“d”, to induce B“c”, and then follow with something like W”f”, to leave the entire Black group “floating” without either eyes or shape.br>
And that possibility is one of the reasons that this B1 as the way to maintain Black’s connection is not often best.


Diagram 15 A bit more stylish and versatile is B1 here.

After this if W “a” pushes into the gap in the Black formation, depending on surrounding circumstances B“b”, “c” or “d” are all sufficient to maintain Black’s connection with good shape.

But even this usually isn’t best because this B1 doesn’t reach far enough out from his wall.


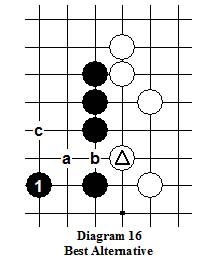
  Diagram 16 So after further reflection, the one point skip of B1 here is revealed as the move that best accomplishes all of Black’s objectives!

After this, if White makes the shape-killing placement at “a”, B “b” connects efficiently because W“a” is now almost trapped.

After that, playing immediately (as at “c”) to rescue W“a” would only help Black. Not only would he then have a larger White group to attack, but (assuming the relatively open center we noted at the outset) that newly formed White group will probably not seriously threaten Black because those White stones will almost certainly be weaker than the Blacks they are supposedly attacking.

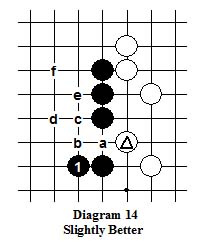
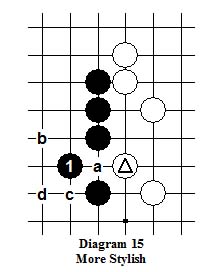
If after B1, instead of W“a” White pushes at “b”, with B“a” the position reverts to Dia 15 after W“a”, B“d’ there.

After W“a”, B“b”, if White doesn’t extend from “a”, then if and when appropriate, B“c”(or even a more distant Geta) is a further stylish play that assures that W“a”is trapped, almost certainly yielding Black one eye.


Enclosure

In the big fights that decide the majority of well played games it’s important that each side retain as many options as possible, and key among those options is finding support for both attack and defense from nearby friendly stones.

Groups which are enclosed not only can’t simply run away from an attack, but are also unable to connect with other friendly stones which might offer help, either to win the fight outright or to at least survive it.

It’s also true that if one side is enclosed it’s almost necessarily disconnected from other friendly groups, and in many (but not all) cases that also means that the opponent is connected.

The result is that when looking at the final position of games which are close enough to count, it will much more often than not be true that the side which has the fewest number of groups (= is best connected!) is the winner!

Perhaps most important of all is the fact that


Only Enclosed Groups
Can Be Killed


Therefore

 
To The Extent Feasible

Avoid Becoming Enclosed


Becoming enclosed almost necessarily imposes a burden that is not infrequently sufficient to swing the balance of the entire game in the opponent’s favor. The converse perspective is equally valid, so under most circumstances enclosing the opponent is an excellent strategy. For that reason, understanding the principles governing enclosure constitute a major factor in becoming a strong player.


To Counter An Enclosure Threat

"If In Doubt, Run Out"


The rationale is simple. Enclosed stones:
   - Have no interface with or influence on subsequent play elsewhere on the board.
   - Must be able to make 2 eyes, or die.

Caution! As the board fills up throughout the game, every group will ultimately become enclosed! So the guidelines we discuss here apply primarily during the Fuseki and early middle game.

It’s also true that all such “rules” of behavior represent simplifications of often quite complex situations, but they are nevertheless quite valuable because in surprisingly many cases they also provide the clues that can allow even beginning players to find excellent moves they might otherwise miss.

    Dia 17 Especially in high handicap games, this is a fairly common position, in which White has made a double kakari against a star point stone.

In the absence of special circumstances Black should without fail play to prevent White’s enclosure! For this purpose, B1 as shown is usually best, but sometimes the attachment at either “a” or “b” is preferable.

Dia 18 If Black doesn’t respond to the double attack and allows White to play the marked enclosing move on his key point before answering, he can still (just barely) achieve life in gote as shown, but with even a slight inaccuracy he will almost surely die! And even if he does live, White’s advantage is considerable. So, on balance, Black would be well advised not to allow himself to be forced into this kind of situation!

The principle of searching beyond the obvious for the best move stated earlier generally applies, but it’s especially relevant in the enclosure context, where the sense of relief that almost necessarily accompanies a successful escape may readily blind you to the fact that a superior global result might have been obtained if only you’d looked further for a better move.

Here’s a fairly “typical” situation which beautifully illustrates this scenario.


Dia 19 In this game between two 5 D’s, the 12 marked White stones are almost enclosed, with no sure eyes yet! (Although one can be easily made.) So if they don’t get out immediately they will almost certainly be in big trouble, possibly even resulting in a loss sufficient to cost White the game!

So what’s the best way for White to break out?


Diagram 20 Beginning with the atari of W1 and then continuing with the forcing plays thru W9 succeeds in allowing White to escape, and in some situations would be the best way to play, but not here!

The problem with it is that Black becomes too strong on both sides.

So finding a better way to get out is highly desirable.


Diagram 21 Beginning with the atari on the other side is clearly better, because now Black has only been strengthened on the left, but it’s still inferior!

Although many players might be satisfied with this, the 5D who played White in this game looked further, and found something better!

Do you see it? Try to find it for yourself before looking at the next diagram.


Diagram 22 With the stylish “dog’s neck” extension of W1 here, White not only gets out as smoothly as before, but now is one step ahead in his race into the open center - a major difference in enabling a later connection to friendly stones or forming eyes. (W1 works because “a” and “b” are miai for it to remain connected to his group below!)

Perhaps equally important, playing this way doesn’t induce Black to strengthen himself on either side!

White escapes in each case, but the seemingly small difference between Dia 22 and either Dia 20 or Dia 21 can easily change the balance between victory and defeat in a close game!


Fighting Against Unenclosed Groups


Because
Only Enclosed Groups
Can Be killed,

There’s Little Value
In Playing “Inside” Moves
Against An Unenclosed Group


It’s Usually Better
To Play Outside Moves,
And Force Your Opponent
To Make Eyes And “Live Small”


Caution!

This principle is not absolute! There are circumstances in which the global position makes it more advisable to strike first at the opponent’s key shape point(s) to prevent an easy two eyes, and then profitably harass the fleeing group as it struggles to either connect or secure its eyes in the center.

The following shows a situation in which attacking an unenclosed group from the inside was counterproductive.


Diagram 23 This is the position a few moves after what we will discuss later as Dia 7, Chapter 2, with Black’s attention focused on the White group in the lower right center.

This White group is not yet enclosed, so it’s in no immediate danger of dying no matter what happens next. But Black evidently reasoned that if he could prevent its ability to easily make two eyes that would both force it to run and make it vulnerable to later profitable harassment. So....


Diagram 24 B1 invaded to occupy the key shape point of the White formation, hoping to either cut it apart or prevent its making eyes.

Allowing B2 next would enable B1 to connect out to the Black corner stones, shattering the White group’s viability and forcing it to run into the center eyeless. W2 was the best way to prevent that. Then B3 aimed at either connecting B1 to the left or allowing it to escape.


But White neatly avoided that by extending with the simple but effective W4, assuring the capture of B1 and creating one eye, with good prospects for another and/or easy escape into the center.

So the result of this premature invasion by B1 was not only a tactical failure but also an important strategic mistake, because it made the White group almost invulnerable!


Diagram 25 Instead of the invasion of B1 in Dia 24, Black should simply have played on the outside like this, expanding and strengthening his own formation and aiming to seal White in, while biding his time to when an eye-killing sacrifice attack at the point of “a” might have a reasonable chance of success.


Fighting Against Large Groups


DIRECT THREATS TO KILL LARGE GROUPS

ARE RARELY SUCCESSFUL


Because of the need for efficiency, the enclosure of a large group will often be more or less incomplete. So as the battle progresses and the group continues to grow, those imperfections will typically provide a number of opportunities either to break out directly or to make eyes in place by capturing some of the surrounding attackers.

Consequently


THE BEST PLAN USUALLY IS TO

USE SUCH THREATS INDIRECTLY,

AS THE MEANS OF ACHIEVING

OTHER IMPORTANT OBJECTIVES


Here’s a “typical” example.


Diagram 26 In this game between a 7D and 6D, Black has secured the upper right corner and a small life on the lower right side. In return, White has secured the lower right corner, as well as eyespace on the upper right edge for his large incompletely settled but not yet enclosed group there.

But it’s Black’s turn, and although there’s little chance that he can kill this White group, if possible he’d like to keep the pressure on and gain profit elsewhere by attacking it. But how to do that?


Dia 27 The Knight’s Move of B1 is the strongest way to proceed! Although White can then readily live on the edge if he acts immediately, allowing himself to become enclosed is bad strategy! So instead White tried to escape.

Dia 28 With this sequence, Black deliberately didn’t go all out to try to prevent White’s escape! Instead, he cleverly parlayed enclosure threats to build center strength (note the almost captured W6 and 8), resulting in a global advantage that ultimately enabled him to win the game.


Click Here To Go To
Chapter 1 Problems

Click Here To Move On To Chapter 2

Click Here To Return To Table Of Contents

Click Here To Return To Milt's Go Page


Click Here To Email Your Comments/Suggestions To Milton N. Bradley