Improve Fast In Go

© Milton N. Bradley 2008


Chapter 2 - Important Stones


At each turn, the player’s primary task is to find the globally best move in the current position! In doing this, appropriate tradeoffs must be made between many diverse yet complementary factors (e.g. territory vs. influence, attack vs. defense, etc.) if a good result is to be achieved.

But those essential factors are really useful only after you have successfully identified:
   - Which stones are globally important and which are not, and
   - Whether the important stones are strong or weak


Important Stones
Require Attention/Action!

Unimportant Stones
May Often Be safely Ignored.


But what makes stones important?

Safe stones which enclose territory are valuable, of course, but in the sense relevant to our focus on fighting:


Stones Are Important
Only To The Extent That
They Significantly Influence Further Play


There are seven (7) ways in which this importance is manifested.

Stones are important if they significantly affect:
   1. Contesting /controlling a key board area.


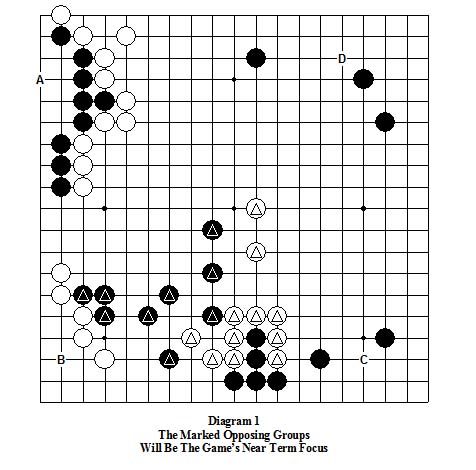
Diagram 1 In this early middle game between two 5D players, the only areas now fully controlled are A (Black) and B (White). They are somewhat different because although the Black “A” group is alive and takes about 8 points of territory, it’s almost completely contained and is therefore unimportant to the future course of play! The White “B” stones are somewhat important because they impact the adjacent still unsettled marked Black stones.

Although Black almost has control of the C and D areas, both are still open to a White invasion so these stones are at least moderately important.

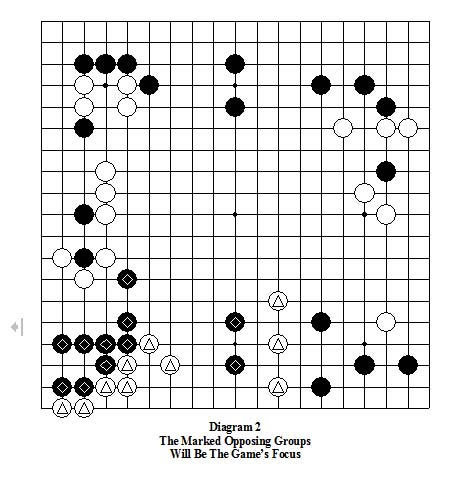
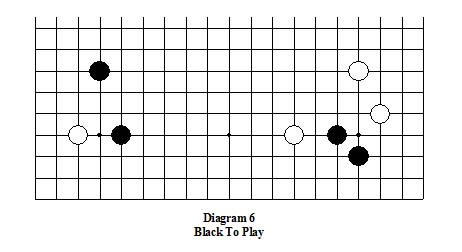
The game’s main focus from this point on will center on the fact that each side has a large (marked), still unsettled group in the lower center. Black’s group has much better eyeshape, but White has more open space available, so there’s no real advantage on that score at the moment to either side.


Diagram 2 In this early middle game between two 1D players, the marked weak White and Black one point skips in the lower center and the two not yet settled Black and White groups to their left are not only important, but will form the focus of future action until their respective fates are resolved.


   2. Deciding which side wins or loses an important fight.


Diagram 3 In this game between a 9D and 7D, W80 completed the enclosure of the huge Black center group, thereby making it vulnerable to attack. With Sente, Black can easily secure his group, but unfortunately he missed the potential of the marked White stone and mistakenly believed that he was safe. So ....


Diagram 4 When B81 made the territorially large move on the right side, W82 - 92 shocked him by developing the marked White stone to cut the big Black center group apart, leaving it with portions already dead and the remainder with only one sure eye. So Black resigned.

Instead of B81, if Black had recognized that he was so vulnerable to being cut apart, the simple play at 83 would have trapped the marked White stone, not only creating a sure eye for Black but also essentially unifying all his local forces. After that, given his solid positions in all 4 corners, the game would have favored him.


   3. Assure your own shape and/or prevent the opponent’s.

 
Diagram 5 In this early Fuseki position between two 5D players, B5 instead of the more customary B7 was a slightly atypical conclusion to the popular Joseki in the upper left corner.
br> After this, if W6 at “a” to approach the upper right corner stone, B“b” would happily squeeze while creating an ideal Black formation in the upper left. So if White wants to prevent Black from getting too much territory locally that way, he has little choice but to invade with W6 as shown.


Although this is a reasonable strategy for White, the price he must pay for it is allowing the blocking attachment of B7. This threatens to continue at 8 to make perfect shape for Black while seriously damaging W6, so it induces W8 to prevent that.

But that gives Black the opportunity of making a large knight’s extension from the upper right corner stone with B9, which does double duty by also preventing White from creating his own base via the ideal 3 point skip third line extension to “a” from the 2-stone base of W6-8.

The result as shown is a newly created W6-8 group that must flee baseless into the open center, and this is a large part of the reason that the somewhat “unconventional” B5 was such a strong move!

Although W10 was the move actually chosen next to flee into the center, any of W “c”, “d”, “e” or “f” might in some circumstances be preferable alternatives, the choice between them depending on the location of other nearby stones of both colors, and White’s strategy.

Here’s another excellent example.


Dia 7 When B1 sealed off some eyespace and territory in the corner, a Black followup at 2 would have created a powerful pon nuki eye shape, inducing W2 to prevent that.

In turn, W2 threatened to follow with at 3 to seal in the Black corner, so Black somehow had to prevent that.

B“a” next would get Black safely out, but wouldn’t apply much stress to either the White position on the right or the left, nor would it also look forward to playing at 5. So, on balance, B3 here was best.

Next, White would dearly have liked to play at 5 to make good shape while blocking Black’s progress, but the weakness of the lone White stone to the left made W4 necessary to provide the beginnings of a base there.

That in turn allowed B5 to occupy White’s key shape point, making W6 necessary to provide the White stones on the right with their own base.


   4. Expand/enclose your own territory/eyespace and/or reduce the opponent’s.


Dia 8 In this position, a few moves after that of Dia 7, whoever plays first locally has an enormous advantage!

Dia 9 If it was White’s turn, W1 would provide eyespace, stabilize his stones, and also greatly diminish both the territorial and eyemaking potential of the 4 Black stones to its left.

But it was actually Black’s turn, so ...

 
Diagram 10 B1 is an ideal multi-purpose move because it:

   - Provides eyespace for the Black stones to its left

   - Prevents the excellent W“a” (as just discussed).

   - Threatens to follow with B“c”, to seriously undercut (and attack) the still unsettled White 2-stone group to its right.

B“b” instead would be a mistake because it would induce W“c”. Then if B 2, White would have Sente for W“a”and that would be bad for Black (as already noted).


B2 instead of B1 would also be wrong! Not only would that make Black overconcentrated, but, instead of defending via W“b” (which would leave White overconcentrated himself and allow B1 after all!), White would simply answer W“a”,with advantage.

After the correct B1 the diagonal extension of W2 was prudent, and not strictly Gote because it not only provided White’s own eyespace while making B“b” or “c” ineffectual, but also threatened W“d” to destroy Black’s base in the corner at an appropriate later moment.

   5. Ensure your own and/or prevent the opponent’s shape and/or connection.


Diagram 11 Both sides share the same key point here, although its implications are quite different for each.

It would provide both shape and connectivity for Black if he can seize it, and make Black’s shape impossible if White can play there instead.


Diagram 12 If it’s Black’s turn, B1 would provide both ideal shape and connectivity, making Black very strong locally.

But it was White’s turn, so ...


Diagram 13 After W1 on the key point destroys Black’s shape, it’s necessary for him to defend in order to assure the connection between the two marked stones and his main force, to prevent White from capturing them to make a big lower side territory.

White’s threat is to cut via W“a”, B“b”, W“c”, or W“a”, B“c”, W“b”, so let’s see how Black should best play now to ensure his connection and prevent White’s big local gain.


Diagram 14 The first idea that might occur is to play B1, which will undoubtedly induce W2 to give White shape and some territory, while also ensuring that Black stays confined.

Then B3 makes a “bamboo joint”, assuring a virtual connection, but in Gote.

The problem with this for Black is that, if later B“a”, depending on what’s going on elsewhere on the board White may not feel constrained to answer at “b” in order to ensure Black’s confinement!

So instead ...


Diagram 15 Best for Black is to begin with the Knight’s Move of B1 here, because now W2 is forced, else B2 connects out.

Then after W4 and B5, this position is identical with Dia 14 except for the addition of B1 and W2.

But that exchange favors Black, because B1 is a cutting stone which may later either cause White problems or force him to expend resources to ensure its capture, while W2 merely adds an insignificant amount of extra strength to an already very solid White formation! The difference between Dia 14 and 15 may be small and subtle, but it’s the kind of thing that not only wins close games, but also distinguishes really strong players from ordinary ones!


   6. Keep your own stones strong and/or the opponent’s weak.


Diagram 16 At the moment, both of the marked stones are unsettled, but whoever gets to play at “a” will instantly make his own stone strong and seriously weaken the opponent’s. So this is a key point for both sides which takes priority, and must not be missed!


   7. The group contains too many stones or occupies too vital a position to afford to give up. The basic principle to be followed is:


Urgent Moves

Before

Big Moves


This means that you should always play to secure the eyespace/eyeshape and/or connectivity of your own important weak groups (or attack the opponent’s) before even considering making moves with “mere” territorial implications, almost no matter how large!

This is a principle that strong players invariably follow almost instinctively, but which weaker ones often have yet to learn.


Diagram 17 In this game between two mid-single digit Kyu players, when B1 was played White should have answered with W“a” to secure some eyespace as well as his center connection for his 4 stones at the top. Instead, he foolishly ignored the safety of this weak group to play the territorially big W2 on the right side.


Diagram 18 After the mistaken W2, B3-7 severely punished White’s failure to secure his center connection by cutting his formation apart and winning 5 stones with enormous profit, forcing White’s resignation only a few moves later.


Finally, before we leave this important topic, it’s essential to be aware that


The Relative Strength And Importance

Of Stones Constantly Changes,

And Therefore Must Be Reappraised

Before Every Move!


To better understand the meaning and implementation of this important concept, let’s look at an example from an early middle game position contested between two 5D players.


Diagram 19 As things stand now, the marked 3 stone White wall seems not only strong (it has 6 liberties and a large adjacent open area), but it’s also unquestionably considered very important by both players because it sketches out the beginnings of a huge White moyo on the lower side, in conjunction with the two Whites on the right.

But watch how that appraisal changes in what follows, as both sides evaluated the evolving dynamics as they continued from this position.


Diagram 20 Black concluded that, despite appearances, the 3 marked White stones were vulnerable, so he attacked very aggressively with B1 to prevent them from readily making a base and too much secure territory on the lower edge.

W2 counter-squeezed B1, because at the moment that lone Black stone is weaker than the 3 stone White group! His objective was to prevent Black’s easily making a base for that lone stone, while beginning to sketch out a substantial White territory between W2 and the lower right corner stones.


Then, after the brief sequence of B3 thru B7 that followed, White apparently realized that the influence the 3 stone wall had formerly been providing had essentially ceased to exist, with the result that his evaluation of those 3 stones had suddenly changed, not just from an important valuable asset to one that was relatively unimportant, but to an actual potential detriment!

So White concluded that running out to save those 3 stones in the current global position would be counterproductive. Instead, it would be better to change strategy, and rather than trying to save those 3 stones to use them as sacrifices in order to help consolidate as much of his lower right territory as possible! So ...


Diagram 21 The result: The formerly important 3 White stones have become Black prisoners, but in return White has consolidated about 30 points of territory in the lower right corner!


The key idea to grasp is that

White didn’t view his 3-stone wall as a fixed asset, but rather as just another potential bargaining chip, which he was prepared to trade in at any time if sufficient compensation was available to make that transaction profitable for him.

If you proceed with that kind of flexible attitude, as your skills advance with experience you won’t be confronted with the need to change your mental perspective in order to realize the rating improvement that should rightly be your due!

Now let’s try a few problems to see how well you not only understand these concepts, but can recognize them as they occur in real game situations.


Click Here To Go To
Chapter 2 Problems

Click Here To Move On To Chapter 3

Click Here To Return To Table Of Contents

Click Here To Return To Milt's Go Page

Click Here To Email Your Comments/Suggestions To Milton N. Bradley