Improve Fast In Go

© Milton N. Bradley 2008


Chapter 3 - Strong/Weak Stones


Strong Stones

Are An Advantage


Strong stones require little or no defense, so they allow you to attack or play aggressively.


Weak Stones

Are A Disadvantage


Weak stones require defense, so they also require more cautious play.

In many real game situations, beginning or intermediate players may find it quite difficult to correctly determine, in advance of its being played through to a conclusion, whether a fully or only partially enclosed group is going to end up alive (= very strong) or dead (= maximally weak)!

That in turn means that the assessment of such a group’s viability upon which the player will have to base his strategy will often be more of a “guesstimate” than a fully reasoned and reliable judgment.

The only long term solution to this problem is to develop your assessment ability via the study of Tesuji and Joseki, solving many, many life-and-death problems, and watching and/or playing a lot against the strongest players you can find. Since, as earlier noted, all of that is part of the “standard” protocol for progressing in Go, it will not be further discussed in this book. Instead, our focus will be on identifying the factors that determine the strength or weakness of stones.


Strength of stones comes in two disparate incarnations:

   - Intrinsic Strength tends to remain largely invariant as the position changes.

   - Relative Strength is always influenced by and is frequently extremely sensitive to even small changes in the proximity and configuration of nearby stones, so it must be continuously and carefully reevaluated move-by-move.


A. Characteristics of Intrinsically Strong Stones:

   1. Already Have 2 Eyes, or can make them despite any opponent attack. (Very Strong)


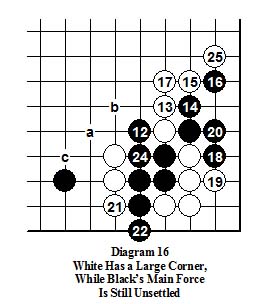
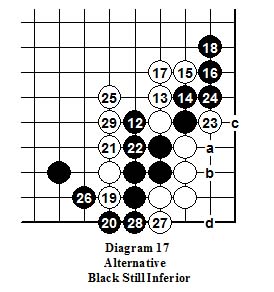
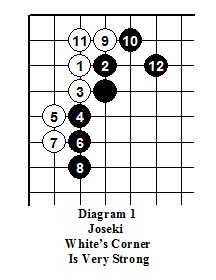
Diagram 1Although the White corner stones are almost completely enclosed, they’re safe and strong because there is no way that Black can directly prevent them from making two eyes!

The problem with White’s strength here is that, except for the territory enclosed it’s essentially wasted, because these stones are almost completely cut off from any interaction with the remainder of the board. (So in the sense of the last chapter, these stones are unimportant!)


   2. Have Good Eyeshape. (Strong)


Diagram 2When W2 is distantly squeezed by B3, making contact via W4 on the 3-3 point begins several popular Joseki variants.

In this variant, after the W8, B9 exchange White’s shape is good and he may safely play elsewhere, because either W“a” or “b” will assure his two eyes!


   3. Enclose Sufficient Space For Eye Formation, Even Under Attack. (Strong)


Diagram 3The White corner is large enough and configured well enough that it’s virtually as strong as if it already had eyeshape.

As things stand, with even minimally correct play White is assured of being able to make 2 eyes despite any Black attack.


Diagram 4 The upper left corner of this Fuseki, contested in the 2006 North American Masters tournament between Ming Jiu Jiang 7P (Black) and Z Chen 6D (White), shows a not uncommon type of local resolution, in which Black has created superb thickness (and a burgeoning left side moyo in conjunction with his B5-11 stones below), in return for White’s large profit in both the upper and lower left corners.


B. Characteristics of Relatively Strong Stones:

   1. Are effectively connected to a very strong group. (Strong)


Diagram 5 At the moment, the virtual connection between White’s three marked stones and his two-eyed corner group is safe because if B“a”, W“b”, B“c”, W“d” connects.

But this connection is not absolutely secure, because, if played as a Ko threat that White can’t afford to answer, any of B“a”, “b”, “c” or “d” will set up a cut.

So this situation will have to be carefully watched by both sides until it’s definitively resolved.


   2. Are in an open area, with no significant problems for the opponent to exploit. (Moderately strong)


Diagram 6 The marked White stones have the beginnings of both shape and modest territorial enclosure, plus free center access. So they are safe for the moment. But until the local situation is definitively resolved, White must be wary of their being later undercut, separated, and/or enclosed.


   3. Any Significant Nearby Opposing Stones Are Weaker. (Moderately Strong)


Diagram 7 The Black stones both above and below the 3 Whites are relatively strong because they have reasonable eyemaking potential at the edge. The Whites are somewhat weaker because it’s somewhat harder to make eyes in the center.

But the White stones are far from being completely without resources, because they aren’t anywhere near being enclosed. They have lots of room to run (to “a”), or to make eyespace and shape if necessary, beginning with either “b”, “c”,“d”, “e”, or “f”as appropriate to the overall global position.

Because these stones are currently far from being settled, White must continue to monitor this situation very carefully, especially if B“a” is played.


C. Characteristics of Weak Stones:

Stones are weak because they exhibit serious deficiencies in one or more of three major areas:

   1. Enclosing eyespace and/or making shape.
   2. Connectivity.
   3. Liberty count.


The relative weakness of a group exhibiting one or more of these deficiencies is a function of the seriousness of the deficiencies, how many of them it exhibits, whether or not the group is enclosed, and whether or not it’s involved in a fight with an equivalently weak opposing group.

In general, groups which exhibit deficiencies in more than one of these areas and/or are enclosed are weaker than those which are deficient in only one area and/or are not enclosed, but that’s not universally true because a even a single deficiency can be fatal if it’s sufficiently great!

Caution! Maintaining Sente is always advantageous, but is especially so when involved in a semeai with opposing stones because it not infrequently develops that winning that fight is more a function of who can strike first or most effectively at the opponent’s weaknesses, than of who can best defend his own.


Dia 8 The Black group lacks both eyespace and shape, so ...

Dia 9 If White can play at 1, it would effectively rob Black of his base, leaving this key group floating and vulnerable!

Because that would be disastrous for Black ...

Dia 10 With Sente, the simplest and most solid way for Black to play is with B1 on that same key point, as shown here.

This not only provides Black with excellent shape, but does so without inducing White to strengthen the 2 stones below, which may now be potentially vulnerable.

   2. Connectivity Deficiency

    Dia 11 11 The two point skip between the W2 and W4 is weak because it can easily be cut if Black moves first! But it’s still joseki because doing so will not necessarily be profitable.


Dia 12 B1 is the correct way to begin, and after the strong hane of W2 the drawbacks of B3 and W4 naturally follow. After that, the cut of B5 separates White. But after B9 and W10 the overall result is considered even, and that’s why the 2 point skip in Dia 11 is Joseki!


   3. Shortage Of Liberties

   “The Five Liberty Criterion”

   There is one simple but almost transcendentally important idea that governs fights between opposing groups:


WHEN OPPOSING STONES ARE IN CONTACT,
AN UNENCLOSED UNIT IS STABLE,
AND A PLAY ELSEWHERE IS FEASIBLE,
IF THE UNIT HAS 5 OR MORE LIBERTIES.


This is generally an excellent guideline. But as with all other such criteria it has exceptions, so every position must be judged on its individual merits.

Understanding this one simple idea can completely transform your ability to properly conduct many of the fights which arise.

The beauty and power of this elegant criterion is that in many cases it makes it possible to find the right move (or at least avoid a seriously wrong move) without the necessity for making a precise and detailed analysis of many complex alternative move sequences!

Simply knowing that a given proposed defensive move will leave a key group with less than 5 liberties is usually an indication (but not an absolute proof) that those stones will sooner or later be in trouble and may die, and that such a proposed move is therefore not likely to be best.

Conversely, knowing that a proposed defensive move will yield at least 5 liberties for a threatened group is an indication (but also not a proof) that it isn’t likely to die immediately or easily.

Failure to obey this simple precept is a prime cause of many of the tactical debacles which surprise and plague beginning and intermediate players, as the following examples demonstrate.


Dia 13 This is the beginning of a “the main line” of a popular Joseki which frequently arises in both handicap and even games.

When B2 squeezes W1, diving into the corner with W3 is one feasible (and common) way to proceed.

After B4 and W5 the relevant question to our present interest is what Black should play next, and the 5-Liberty Criterion provides the answer!


Dia 14 The extension of B6 is necessary, and when it’s correctly played as shown the 3 stone unit that it completes then has 5 liberties, and so is “contact stable” - i.e. able to fight successfully.

After W11, White has secured the corner territory plus egress along the right side. In return W1 is temporarily abandoned, while Black has 6 liberties, thickness, plus some territorial potential along the bottom.

Now let’s see what bad things can happen if B6 is played differently.

 
Diagram 15 Here B6 is played as a “Hane at the head of two stones”, a well known Tesuji which is often the best move, but which is a disastrous error in this position!

The reason it’s wrong here is that it leaves the two stone B4 unit with only 4 liberties, and therefore “contact unstable” - i.e. lacking enough liberties to sustain a fight.

An alert White will immediately take advantage of this via the Hane underneath of W7, followed by B8 and the two forced connections of W9 and B10. Then when W11 cuts, not only is B6 isolated, but (more important) the B4 -10 4-stone unit has only 3 liberties, and is in serious trouble!


Some feasible continuations are shown next, to give you some idea of just how badly Black can fare after this error.


Dia 16 In this variation White gets an enormous corner by capturing the 5 B14-20 stones, and B“a”to trap the 3 White stones doesn’t work! So B“b” to escape is necessary. But this allows either W“a” or “c”, and then White’s prospects in the coming fight are at least as good as Black’s.


Dia 17 This continuation is somewhat better for Black, although White is not only alive in the corner with the sequence B“a”, W“b”, B“c”, W“d”, but also has tremendous thickness in the center, while Black’s position is low on both sides.


There are also many other possible continuations after the cut of W11 in Dia 15, some better than those shown and some worse, but all are inferior for Black because of his violation of the 5-Liberty Criterion!


Click Here To Go To
Chapter 3 Problems

Click Here To Move On To Chapter 4

Click Here To Return To Table Of Contents

Click Here To Return To Milt's Go Page

Click Here To Email Your Comments/Suggestions To Milton N. Bradley