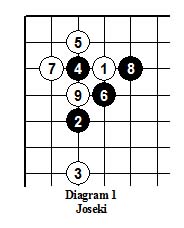
Dia 1 In this variation of a popular 3-4 point Joseki, Black plays for thickness while conceding the corner territory to White.
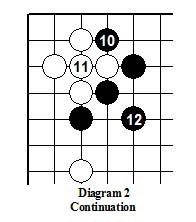
Dia 2 After the atari of B10, W11 connects, and then B12 makes a double “Tiger’s Mouth” virtual connection.
|
DON’T PEEP IF A CUT SUCCEEDS |
|
|
|
|
Dia 1 In this variation of a popular 3-4 point Joseki, Black plays for thickness while conceding the corner territory to White. Dia 2 After the atari of B10, W11 connects, and then B12 makes a double “Tiger’s Mouth” virtual connection. |
|
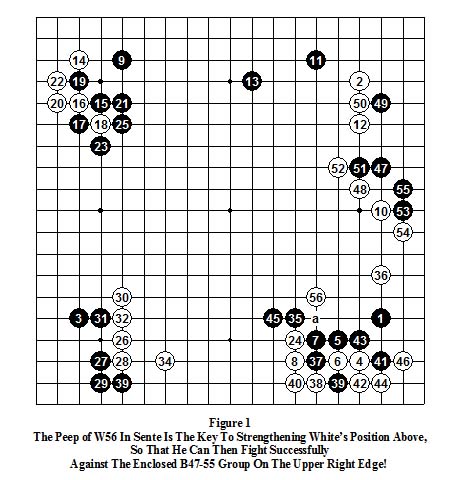
Figure 1 In this early middle game between two 4D players, the key issue at the moment is the fight in the upper right that has just begun between the enclosed and still unsettled B47-55 group and the enclosing W10-54 stones, which are still lacking shape and which therefore must be strengthened before he can safely attack Black. The solution to this dilemma that White conjured up was W56, peeping into the cutting point at “a” in Black’s lower right group. Because the B1- 43 stones would be forced into a dangerous (and quite possibly disastrous) fight if cut off, that gave Black essentially no choice but to connect at “a”. Having thus helped stabilize his own weak stones in Sente, White was then able to turn his attention back to the desired attack on the weak Black group in the upper right corner. So in this position the peep was the perfect move! |
|
The Typical Intention Of A Cut Is To Permanently Separate A Group Of Opposing Stones |
|
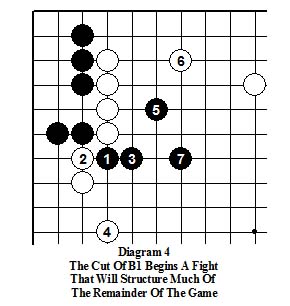
Diagram 4 In this position from a game between a 9D and a 7D, the hane of B1 is a typical continuation of the Joseki in the corner. After the exchange of W2, B3, the necessary continuation thru B7 resulted in the creation of a weak Black group, in return for which White’s thickness has been effectively neutralized. Whether or not this turns out to have been good strategy by Black will depend on the followup by both sides. |
|
Cuts Are Also Commonly Used To Make Shape Or To Facilitate Escape |
|
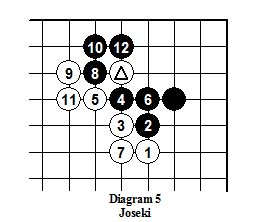
Diagram 5 The cut of B8 followed by the forced sequence thru B12 sets up the capture of the marked White stone, resulting in White’s superb thickness in return for Black’s securing a large corner. Now let’s look at a position in a game between two 5 D’s in which making a judicious cut was the best way for a nearly trapped group to escape. |
|
|
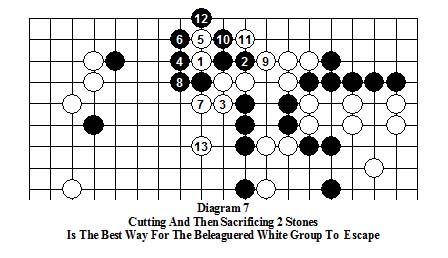
Diagram 7 Cutting with W1 is the way to begin.! That makes W3, 5, 7, 9 and 11 all forcing moves, sacrificing 2 stones (W1 and 5), and then moving smoothly out with W13., and leaving behind the potential for an almost certain eye at the top. Beginning instead with either W3 or W7 would allow either the connection of B1 or the extension of B10, and then White will have to flee eyeless! The outcome of a cut will frequently not only be decisive (as in these examples), but sometimes unpredictable, at least among players at less than a very high level, with the result that: |
|
Making A Judicious Cut Is Often The Most Powerful Way To Play, And Sometimes The Only Possible Route To Victory |
|
Cutting Can Be Fraught With Danger |
|
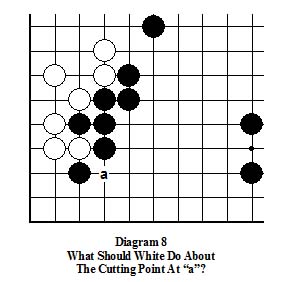
Diagram 8 This is a not uncommon position, especially in high handicap games. At first glance, it appears that a White cut at “a” will be big, so that it’s necessary for Black to protect against it. But that’s only an illusion! On deeper analysis, it becomes apparent that a White cut at “a”is actually infeasible! |
|
|
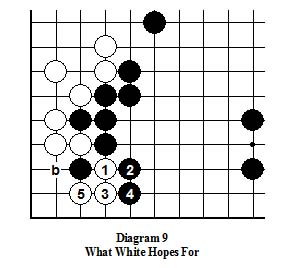
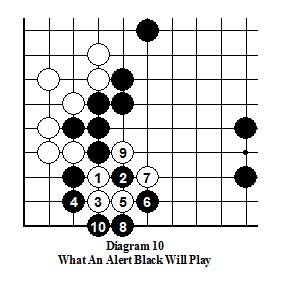
Dia 9 If W1 cuts, expecting (or hoping for) this submissive B4 in response to W3, he may be in for a big surprise because ... Dia 10 After this B4 instead, if White foolishly continues as shown here, Black has this forcing sequence (a “squeeze”) with which to ruin White’s shape. Then ... |
|
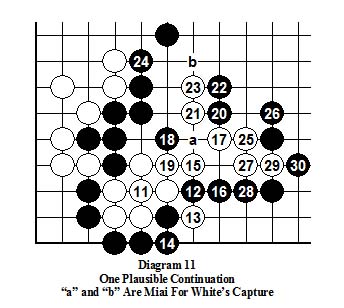
Diagram 11 After the atari of B10 forces the connection of W11 (with simply awful shape), the exchange of W13 for B14 is necessary to allow W15 to be an atari, which then forces B16 and gives White time for W17 to move out. This diagram shows one continuation after the plausible diagonal move of W17. Unfortunately for White, it fails. But there are lots of chances for Black to go wrong in the resulting fight, so White may well live instead if Black plays weakly. |
|
Capture Any Cutting Stone(s) As Soon As Possible |
|
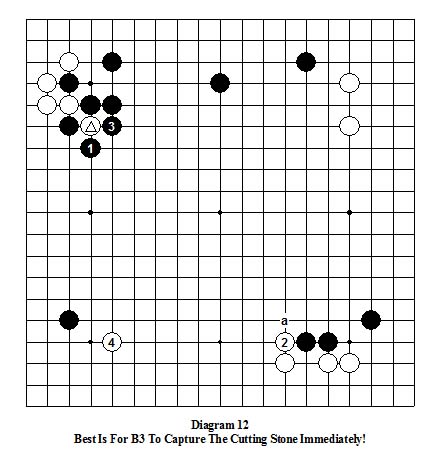
Diagram 12 When B1 ataris the marked White cutting stone, it sets up a ladder which favors Black because it runs into the Black stones in the lower right corner. Then W2 is a ladder breaker! But instead of playing the natural appearing B“a”, which would reinstate the ladder, Black’s best response is to immediately capture the White stone with B3, removing its dangerous Aji, perfecting his thickness, and thereby strengthening his now nearly complete moyo on the upper side. That this allows the excellent W4 is regrettable, but unavoidable. |