Improve Fast In Go

© Milton N. Bradley 2008


Chapter 5 - Sector Lines, Enclosure & Connectiivity


In the previous chapters we discussed the principles upon which fighting must be based if it’s to be productive, and then spelled out how to identify the weak, important stones which should be the objects of any attack. In this chapter we begin the discussion of the criteria for deciding whether and when to initiate or avoid such attacks.

Among the key operative themes in attack/defense are the closely related factors of enclosure and connectivity. These often become significant almost from the very earliest moves in the game as both sides maneuver for advantage, especially but not exclusively in the complex local (usually, but not exclusively corner) confrontations called Joseki.

Another important issue, closely related to enclosure, is how to act against an opponent’s moyo. Moyo situations are typically quite complex, so without some simplifying concept to provide guidance the average player would find it virtually impossible to accurately assess their often subtle interactions, and then make the correct decisions.

The ingenious concept known as a Sector Line efficiently satisfies the critical need for guidance in both the attack/defense and moyo situations.

Although the Sector Line concept has been applied implicitly for centuries in the Orient, the first explicit description of it of which I’m aware was in a mid 1970's article by Bruce Wilcox in the American Go Journal.

But just what is a Sector Line?


A Sector Line Is An Imaginary Straight Line

Extending Across An Open Board Area

Joining Two Stones Of The Same Color,

Or Extending From A Single Stone

To The Board Edge.


The Sector Line’s conceptual rationale is that a solid wall of stones of that color could theoretically be constructed along that line. The fact that such a wall will almost never be realized in practice does not affect the Sector Line’s value as a guide to making the appropriate strategic and tactical decisions.


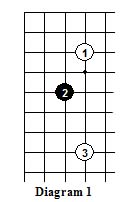
Diagram 1 When B2 approaches W1, the squeeze play of W3 is particularly effective because ...

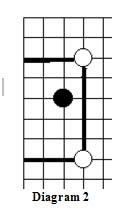
Diagram 2 Now the lone Black stone is enclosed within the indicated White Sector Lines, as both players would visualize them.


When To Use Sector Lines

   - Sector Lines are primarily (but not exclusively) useful in dealing with weak stones, which might be captured if they can’t make eyes or escape.
   - Sector Lines are most often applicable in the Fuseki and early middle game, because it is usually only then that enough of the board is still vacant to make them really meaningful.

The seriousness of the situation for the enclosed stones is primarily a function of:
   - The proximity of the nearest Sector Line.
   - The spacing between the stones forming that Sector Line.


In each case closer is more serious, with the effect diminishing rapidly with increasing distance. No exact criteria exist for determining this spacing/distance effect, so each situation must be individually evaluated using the player’s best judgment.

How Sector Lines Function
   - Sector Lines act as a kind of “early warning system” to indicate which weak stones are in danger of becoming fully enclosed (and thus before the necessity of fighting a life-or-death battle for survival is thrust upon them).
   - Sector Lines provide only generally appropriate action guidelines, and do not specifically identify:
      - the preferred strategy to be followed
      - the best move itself, or even an explicit identification of the set of feasible alternatives from which the best move should be       selected.

Caution! Although the Sector Line concept is both simple and extremely valuable, it’s not always determinative!

A Sector Line is not valid if it:

   - Intersects an opposing stone.


Diagram 3 When B1 is played, it breaks the outer Sector Line and negates it, so that Black is no longer enclosed!


A Sector Line is not valid if it:

   - Intersects an opposing Sector Line.


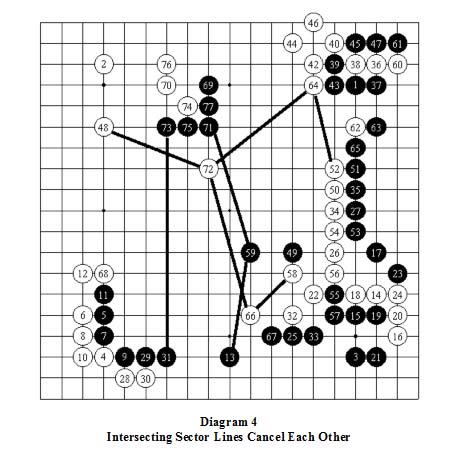
Diagram 4 Here we see that W72 is within Black Sector Lines, but Black’s 69-77 group is similarly enclosed by White Sector Lines which intersect Black’s.

The two B49, 59 stones are within White Sector Lines, but are also an anchor point of the Black Sector Lines which enclose W72.

The result is that none of these Sector Lines are valid for determining the appropriate action to be taken in this area. This sort of situation is quite common when the board becomes relatively crowded, but in no way detracts from the general utility of the Sector Line concept.


Despite these very real limitations, the information Sector Lines provide is invaluable:
   A. To The Attacker, Sector Lines indicate whether or not to try to either:

      1. Steal the opponent’s eyespace, and therefore drive his weak group out into the center. Or

      2. Cut off flight into the center, and so force the weak group to attempt to live, either by making eyes in place or by capturing      some of the attacking stones.

   B. To The Defender, Sector Lines indicate whether it’s best to either:
      1. Run into the center to escape.
      2. Try to connect to nearby friendly stones.
      3. Make eyes.
      4. Abandon the threatened stones (at least temporarily).
      5. Counterattack.


Caution!

In any given position not all of these alternatives may be feasible, and choosing among those that are is a matter of the player’s judgment - a subject on which the Sector Lines themselves offer no direct help! Now let’s examine each of these Sector Line characteristics in detail.

   A. The Attacker’s Uses Of Sector Lines

      1. Steal the opponent’s eyespace


The sequence shown in the following diagrams occurred in a championship game between two 9 Dan professionals, who were then among the top 10 players in the world. Yet the simple Sector Line concept explains and helps predict their moves to a remarkable degree!


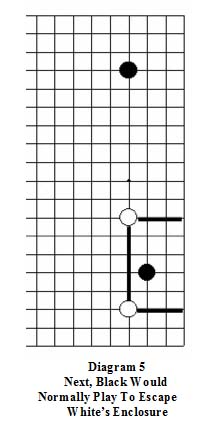
Diagram 5 The position in the lower right corner begins with the same popular 3-4 point Joseki we saw earlier in Dia 1, in which White has just squeezed the lone Black stone from above, enclosing it within the indicated Sector Lines.

These Sector Lines are close enough to constitute a fairly serious threat, so under normal circumstances Black would respond immediately. But because this 9P Black calculated that he can still readily live locally even if White is first to play again here, he instead chose to take Sente elsewhere.

Although this was a rational global strategic decision, it gave White the opportunity to maximize his local advantage, as we see in the following diagrams.


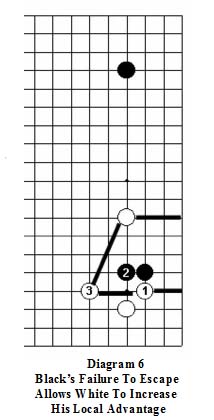
Diagram 6 W1 takes advantage of Black’s failure to defend by blocking him from the corner, making territory for White while making it harder for Black to secure eyespace locally.

If White were to be allowed to continue at 2 next , that would not only make perfect shape for his own stones but would also make it extremely hard for the Black stone to make life locally.

So with little choice, B2 occupies the key shape point himself, while cutting the White Sector Line! (A strong clue that this is a desirable move!)

A (slightly lesser) problem with B2 is that it also makes his unit “heavy”. W3 With this stylish Knight’s move extension, White increases the scope of his control of the corner by extending to the left, at the same time creating a new Sector line which once again encloses Black.(thereby maintaining Sente!)


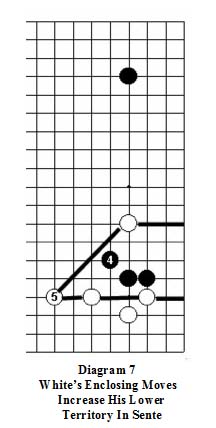
Diagram 7 In order to escape that enclosure it’s necessary to break White’s new Sector Line, and in this position the stylish diagonal extension of B4 is the best way to achieve this end.

An alert reader will have noticed that B4 not only broke the White Sector Line but also established Black’s own Sector Line enclosing the lone White stone on the right side.

But because the Black star point stone anchoring the upper end of that Sector Line is so far away, the lone White stone is only mildly affected by this. So for the moment White can afford to ignore that Black Sector Line, to continue his own attack.

White’s natural response to B4 is to extend once again on the bottom with the one point skip of W5, increasing his local territory while also initiating the new Sector Line shown, to once again enclose the 3 Black stones.


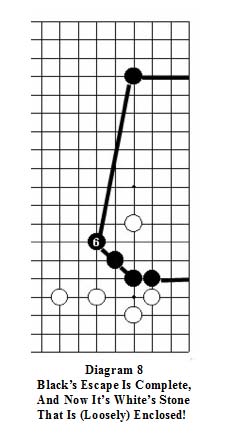
Diagram 8 When B6 breaks the latest White Sector Line, there is no further White move that will simultaneously enclose the Black stones within a new White Sector Line while also extending White’s lower side territory.

That means that, for the moment at least, it is no longer profitable for White to continue playing on the lower side, because it would be Gote.

On the other hand, we see that Black has now established his own Sector Line enclosing White’s lone right side stone.

But because the upper anchor stone of this Black Sector Line is so distant, this lone White stone has more than ample maneuvering room to either make a base or escape into the center if attacked further.

So the Sector Line analysis tells us that White can now afford to play elsewhere if his evaluation of the global board position indicates that would be more productive - and that in fact is what the 9 Dan pro playing White in this game actually did!


      2. Cut off flight into the center.


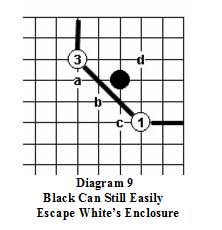
Diagram 9 This is a situation that frequently arises in both even and handicap games when Black fails to respond locally to the kakari of W1.

W3 (which is also often played at “a”) encloses the Black corner stone within White Sector Lines as shown. But Black can still easily break out safely via a play at any of “a”, “b”, or “c”. But if he doesn’t ...


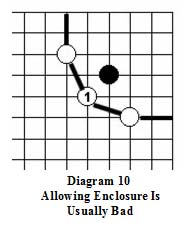
Diagram 10 Most often, White’s strongest continuation is with W1 here, to solidly enclose Black within his Sector Lines.

Black can then cut these Sector Lines, but can’t forcibly break out through them.

Now let’s examine why allowing W1 is usually bad for Black.


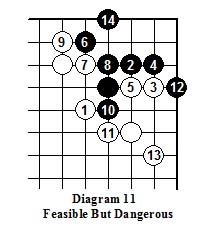
Diagram 11 Black can still live in the corner, if he either knows this sequence by heart or can find his way through its tactical complications unaided.

But it’s dangerous because even a slight error in the sequence can easily result in the entire corner’s death! And even if Black lives, as here, White’s thickness usually gives him the better position globally.

So playing this way is usually only advisable in special circumstances.


   B. Defender’s Uses Of Sector Lines

      1. Run into the center to escape.


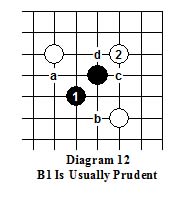
Diagram 12 Black will usually be best advised to break out of the White Sector Line, most often by occupying the key point himself via B1 as shown, but sometimes by attaching at “a” or “b”instead.

After B1, W2 to seize the corner is by far the most frequent continuation, and then Black will usually (sooner or later) block at either “c” or “d”, the choice depending on the global board position.


      2. Try to connect to nearby friendly stones.


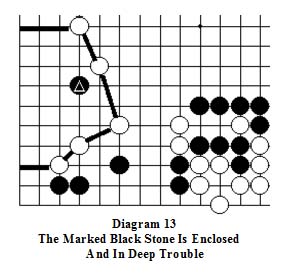
Diagram 13 In this game between an 8D and 6D, the marked Black stone is completely enclosed by White Sector Lines, so it appears that all of this large territory is about to become White’s.

Living in place is difficult, but Black saw an opportunity to save this stone and neutralize much of White’s potential territory in the surrounding area if he could somehow manage to connect to the Black stones below. The next diagram shows how he went about doing it.


Diagram 14 With this clever sequence, Black managed to connect underneath in the lower left and achieve life, thus neutralizing most of this formerly large White area.

In return, White captured a part of Black’s former lower edge group, to sharply increase his own territory there.

So Black’s gain was not without cost, and that’s a fairly common result of such confrontations. But on balance Black has profited a bit more, at least in part because he has emerged from this fight with Sente.


      3. Make eyes.

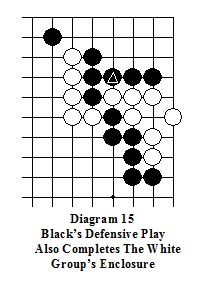
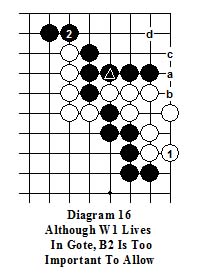
    Dia 15 In this game between two 7D players, when the marked Black stone was played it not only prevented White’s damaging push through-and-cut, but also completed the enclosure of the White 7-stone group on the right edge.

In the absence of special circumstances Black should without fail play to enclose White as shown!

Dia 16 If White now desires, his 7 stones on the right edge can live easily via W1, because then if B“a”, W”b” completes his two eyes.

And if Black doesn’t play at “a”, it’s possible that at an appropriate later time White will be able to follow with the profitable endgame sequence of W“a”, B“c”, W“b”, B“d”.

The problem with making life by playing W1 is that Black will then happily continue with B2 to connect his corner stones out while seriously weakening the important (and presently both shapeless and eyeless) 5-stone “L” shaped White center unit immediately below!

Because that was a prospect that was unacceptable to White, what he played instead of this W1 is shown next.

      4. Abandon the threatened stones (at least temporarily).

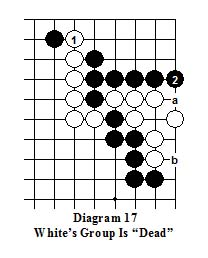
  Diagram 17 Because the result of Dia 16 was unpalatable, White chose instead to play W1 here, to strengthen the crucial weak 5-stone center White string!

This not only undercut the Black corner while preventing Black’s connection underneath, but also isolated the lone Black stone on the upper edge.

But the severe price that White had to pay for this was B2, which more or less assures the death of the White right edge group, because now White needs both “a” and “b” to secure his two eyes, and he can only manage that by making two successive moves here. (Only possible if played as a Ko threat which Black can’t afford to answer.)

So after B2 White had no choice but to tenuki, and hope that circumstances would later enable him to rescue this “abandoned” 7 stone group on the right edge.


Here’s another example, arising in a position that’s not uncommon in both handicap and even games:

 
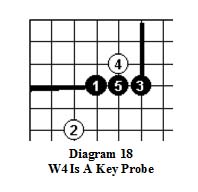
Diagram 18 W4 is a probe intended to induce Black to fix the shape of his stones, so that White will then know how to best proceed locally at the appropriate later time.

But as things stand it was too early in the game to be sure after B5 whether White will prefer to continue below, on the right, or on the 3-3 point in the corner, and W4 is enclosed within the indicated close and very threatening Black Sector Lines. So for the moment W4 was correctly “abandoned”, as White played elsewhere!

(From that, it might reasonably be argued that W4 was premature and should better have been deferred until a later time. But that's an issue well beyond our present focus.)


      5. Counterattack.


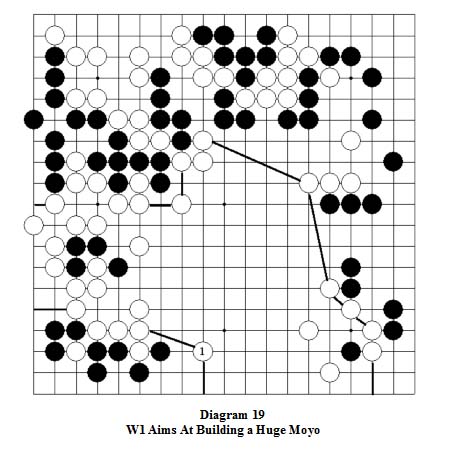
Diagram 19 In this game between a 4D and a 3D, when W1 was played it seemed that White had visualized the indicated Sector Lines and the huge potential moyo that they enclose. But, although appearing logical, this reasoning is actually doubly flawed!

Not only are there are two Black Sector Lines running from the upper right to the lower left that intersect (and therefore neutralize) several of White’s, but, far more significant, Black can counter-attack by establishing his own far more threatening Sector Lines!


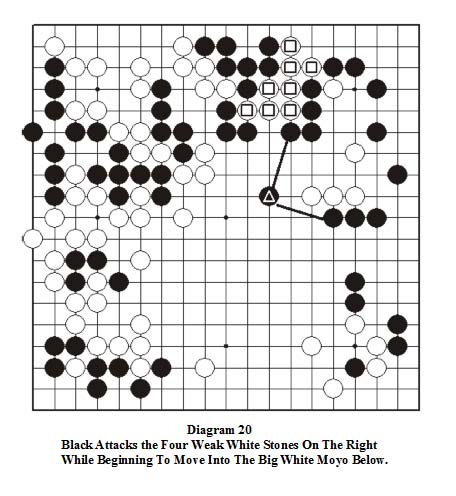
Diagram 20 A strong Black response would have been as shown, not only enclosing the 4 weak White stones within the indicated close (and therefore very threatening) Sector Lines of his own, but also simultaneously assuring that Black can move into the White moyo before it can be consolidated. (Note that the 8 marked Whites at the top are tightly enclosed with only 3 liberties, and are therefore effectively captured!)

Although the outcome of the fight that would have followed isn’t entirely clear, it would have offered Black his best chance to win. When he failed to make this key play, White moved smoothly on to an easy victory!


Sector Lines As Moyo Invasion/Reduction Indicators

    - Playing anywhere inside the opponent’s Sector Lines will constitute an invasion.
    - A play on or just outside an opponent’s Sector Line will initiate a reduction.

The key clues to deciding whether a reduction or invasion of an opposing moyo is the more likely to produce a satisfactory result are whether or not one or more of the following is true:
    - There is at least one long Sector Line operative.
    - One or more of the enclosing Sector Lines have significant gaps for possible ingress or egress by opposing stones,   especially if

    - There are friendly stones fairly close outside those Sector Lines.


If any of these conditions exist, an invasion will often be feasible because there will be opportunities to either connect out or to live within the moyo by placing key eyemaking stones which also threaten to connect out.

To the extent that these enabling conditions don’t exist, only a reduction will usually be feasible.

But it’s important to remember that there are no absolutes! Although the use of Sector Lines will go a long way toward enabling you to make the right decision, your ultimate success or failure in the fighting that ensues will still depend upon your ability to find and correctly time the right threats, and on your opponent’s ability to meet them.

The following example shows the kind of dangerous tactical complications that frequently result from invasions, and why application of the indications provided by Sector Lines must always be made with great caution and forethought.


Diagram 21 This is a not uncommon situation in which Black has made a 5 point skip from a 4-stone wall based on the third line to form a small moyo, against which White will often feel compelled to act.

But how? And where?


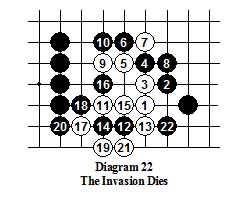
Diagram 22 The best try to make a live group within the Black space is to begin with this one point third line skip of W1 from the extension stone.

In response, the diagonal extension of B2 is the strongest way to prevent White’s escape to the outside, forcing him to try to live in place.

This diagram shows one possible continuation, in which the invasion dies, and the next diagram shows another with the same result.


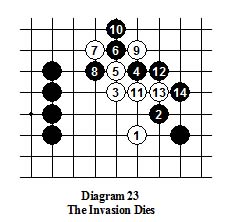
Diagram 23 The problem in this position with an invasion like this W1. is that there really isn’t room enough for the invaders to live if Black defends correctly! And if White does die, as here, that allows Black to consolidate a territory of over 30 points.


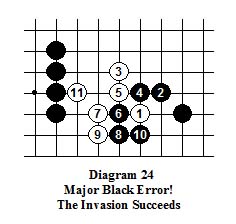
Diagram 24 This diagram shows that if Black errs, then White can escape, with a disastrous reduction to what formerly seemed a large potential Black territory. But in at least partial compensation Black now is strong on both sides while the still eyeless Whites remain weak and vulnerable!


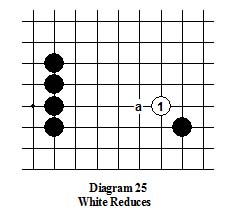
Diagram 25 From the foregoing, it’s likely that a prudent White won’t choose to invade but will instead opt for a reduction.

For that purpose, W1 as shown here (just breaking the Black Sector Line) or “a” are usually the best moves, the choice between them depending upon the location of other nearby White and Black stones and the tactical considerations they engender.


Now let’s see how Sector Line principles were applied in a complex Moyo situation.

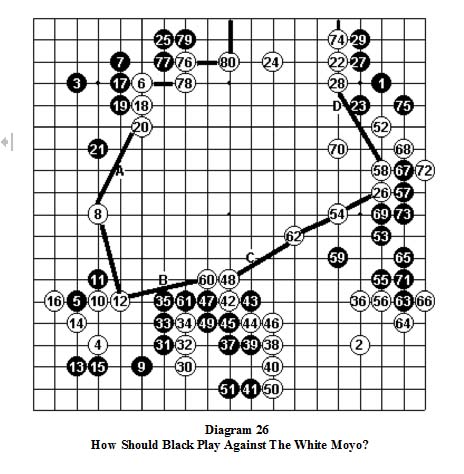
  Diagram 26 In this position from a game between two 5D players, White has created a large moyo in the upper center which Black must do something to reduce before it can be consolidated into a winning territory!

As usual in such situations, the question to be answered is whether Black should invade the moyo and attempt to live within its confines, or try to reduce it by nibbling away at it from somewhere on its outer perimeter.

This is the kind of situation in which Sector Lines can often provide the best clue as to which of these courses of action is likely to be the most productive.

The major difficulty in this position is that a White Sector Line actually covers each of this moyo’s borders, so that only an invasion is really feasible if Black wants to prevent White from consolidating too much of this vast area.

At the same time, we see that there are four places, marked “A”, “B”, “C”, and “D” in which the White Sector Line is long enough and/or Black stones are near enough to it to offer support to an invasion. Such potential places of ingress and/or egress are called “doors”.

Here, only doors A and B offer real potential for Black as things now stand.


A complication is that the White moyo is so large that only a player of professional strength seems likely to be able to even come close to accurately visualizing all of the invasion possibilities and their likely responses in advance. So “mere mortals”, even fairly strong players like the 5D protagonists in this game, necessarily have to largely rely on their “gut” instinct plus confidence in their tactical skills to guide them in making difficult decisions like this.

A detailed analysis of all of the complex tactics involved in the fighting that transpired next in this game is advanced material far beyond the scope of our interest in Sector Lines. So in the discussion of the actual game resolution provided below we will focus only on the main theme of the invasion.

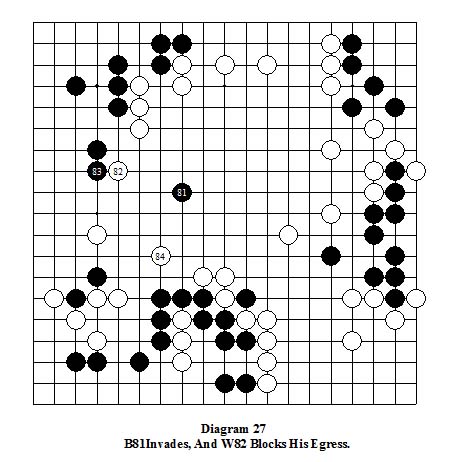
  Diagram 27 Because the main A and B doors capable of exploitation are both on the left side of White’s moyo, it’s clear that Black’s best invasion point must be somewhere in that vicinity, but the choice of B81 as the starting point for Black’s invasion was a judgment call.

W82 Rather than simply trying to limit Black’s incursion, White counterattacked by threatening to continue at 83, which would both restrict the expansion of Black’s upper left corner territory while making a sizeable territory of White’s own in that area in conjunction with his stones below. In addition, it blocked Black’s access to door A.

B83 Given that door B is still open. and because a White continuation at 83 would be too good to allow, Black felt that he had no choice but to block here himself to seal off his upper left territory. So White retained Sente.

W84 similarly blocks off Black’s flight path to door B, leaving Black with the difficult problem of how to continue to achieve life. But now Black’s chances for success are somewhat improved, because he will be able to play a second stone inside White’s moyo before White can respond there.

The details of the complex fighting that actually followed in this game are primarily tactical considerations that lie far beyond our focus on learning how to use Sector Lines, so are not presented here.

CAUTION!! As we’ve seen, with substantial amounts of maneuvering room available inside a substantial moyo, not only does the ultimate capture of any invaders become more uncertain, but the possibility of resulting external complications also increases exponentially.

And even when the invaders are trapped and must be at least temporarily “abandoned”(as in Dia 23), they typically still retain considerable Aji. This may either lead to their later rescue or to an advantage elsewhere for the invader, especially if a Ko fight erupts. So both sides will have to remain alert to this potential until the situation is finally completely resolved or the game ends.

As earlier noted, detailed exploration of those complications is beyond our present interest, but you might find it productive to investigate them on your own.

Now let’s look at a key portion of the Fuseki/early middle game between a 5D and 4D, to see how Sector Lines provide almost unerring guidance to strong (if not necessarily perfect!) moves.


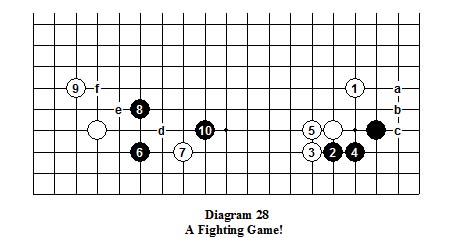
Diagram 28 W1 encloses the Black lower right corner stone within White Sector Lines. Then, in the absence of any more urgent play elsewhere, it’s to Black’s advantage to respond by expanding/sealing off his eyespace to ensure his life.

The defensive attachment of B2 is an excellent, time tested way for Black to achieve safety, and begins a popular Joseki.


After the necessary connection of W5 Black remains enclosed, but his formation can now make eyes against any White attack! So it’s not strictly necessary (although often desirable!) to make a further submissive play like B“a” immediately, because even if W“b” is permitted the simple B“c” gives Black an unassailable live shape.

So after W5 Black can afford to tenuki with sente. But because White is now threatening to build a moyo on the lower side, it’s often globally incumbent on Black to try to prevent that from becoming a reality before it’s too solid to readily counter.

Black’s problem is that, wherever he plays on the lower side now, his stone will already be within (somewhat distant) White Sector Lines! But because the end points of the upper Sector Line are so far apart, that’s not particularly dangerous. So with B6 Black makes a “standard” kakari against the White lower left corner star-point stone.

Because that doesn’t enclose the White corner stone within Black Sector Lines, White need not defend but may instead counter-attack. He does that with maximum force via the squeeze play of W7, which does enclose B6 within close (and therefore very threatening) White Sector Lines, while also making a maximum strategic extension from his W3,5 wall on the right!

This leaves Black with only two viable choices - either dive into the corner and at least temporarily “abandon” B6, or run out to break the White Sector Line. Given White’s thick position in the lower right, diving into the corner would concede White too much almost secure territory on the lower side, so Black has no real option but to break White’s Sector Line! His choice to do this is the “standard”one point skip of B8, although in some global positions either “d” or “e” may be preferable.

B8 is Sente because it encloses the White star-point stone within Black Sector Lines! So W9 (or “f”) to break that Sector Line and sketch out some territory is also natural. Although this also establishes a new White Sector Line enclosing B6,8, in conjunction with W1 all the way across the board, once again its anchor points are so far apart that it has almost no effect.

The result is that Black is free to take sente with the strong “shoulder hit” on W7 of B10, to once again establish close (and therefore very threatening) Black Sector Lines around W7. That’s the “normal” joseki continuation in this position, but in this game the circumstances in the lower right impelled Black to deviate from the “usual” sequence would normally follow, as we see in the next diagram. Although the complex ramifications of this intensely tactical fight are well beyond our focus on the Sector Line concept itself, they’re shown below for the reader’s edification.


The following material may be glossed over at the reader’s discretion.


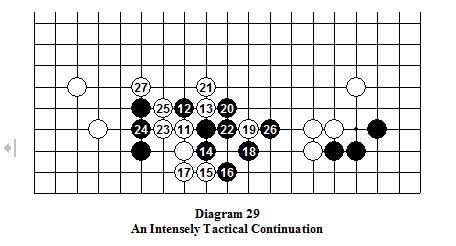
Diagram 29 Instead of continuing with the “normal” Joseki move of W11 at 14 to establish a live group along the edge, with this W11 a swap occurred, with Black destroying White’s potential at the bottom in return for White’s effectively killing the 3 Blacks on the left and almost (but not quite) securing the lower left corner!


End of material to be glossed.


The Limitations of Sector Lines

The action guidelines provided by Sector Lines are necessarily incomplete because:

1. There may be several different groups affected by active Sector Lines at any given instant
, so their presence alone doesn’t change the player’s overall problem of deciding which situation takes priority, and of handling any interactions between them.

2. Sector Lines only provide guidance to an appropriate local strategy! Global considerations involving a nearby corner, side, the center or even the entire board may dictate that a move other than that indicated by a Sector Line analysis is best overall.

    A. From the defender’s perspective, this may mean that a rescue attempt should be deferred, or that a threatened weak group should be abandoned for later use as Aji, despite the fact that it could be rescued!

    B. From the attacker’s perspective, it will frequently mean that pressure should be applied to weak opposing stones without any real intention or expectation of capturing them (although that outcome will be welcomed if it should present itself!), in order to build up strength for use in attaining some important objective elsewhere.

3. Sector Lines do not identify the specific move that works best in any given situation - whether a tesuji, or just the most appropriate strategic play. Correctly identifying the best global move requires a high level of tactical and strategic competence, most of whose development is outside our focus in this book.

Despite these limitations it’s advisable in your own games to:


Look First At The Relative Strength

Of The Opposing Groups

And Any Sector Lines They Generate


and


Override Those Indications

Only If There Is A Clear And Compelling

Reason For Doing So


No single simplifying idea like Sector Lines can instantly transform a beginning or intermediate Go player into an expert, but in many situations it can go a long way toward suggesting reasonable lines of play that might otherwise be missed.

Although the influence of Sector Lines is often easy to see after-the-fact, things are necessarily far less clear in the heat of battle!

Reacting appropriately after you’ve recognized that an opponent’s move has enclosed one of your key groups within a dangerous Sector Line is often essentially routine because there may only be a limited number of viable options, but correctly deciding what to do next when you have Sente with which to play anywhere is quite another matter! Not only is it necessary to decide whether and where you should take profit or attack, but in the latter case to also where you might create potentially profitable new Sector Lines. And even if that hurdle is successfully surmounted, the concept still offers no automatically applicable criteria for judging which of several possible alternative Sector Lines might prove the most profitable. And then the Sector Lines in and of themselves offer little help in resolving any of the inevitable tactical complications that will accompany their creation.

The result is that although full understanding of the Sector Line concept may be necessary, it’s nevertheless an insufficient condition for becoming a strong player! Finding the best move in any given position still requires an entire complex of knowledge and tactical skills that can only be developed over time as a result of much play and study - all of which are outside the scope of this book.

Despite these caveats, mastering the simple idea of Sector Lines offers perhaps the greatest “bang per buck” for the effort expended in any beginning/intermediate player’s quest for improvement!

Finally, it’s also important to recognize that when implementing the Sector Line concept in your own games, you will almost necessarily make some strategic errors and even more tactical ones. And those errors will in turn result in some failures in either or both attack and defense, sometimes even resulting in last minute reversals of winning games in which a long series of excellent moves is completely offset by a single egregious blunder.

But such occurrences, however difficult they may be to accept cheerfully, are a natural part of the learning process and should not be allowed to dissuade you from making the strongest moves of which you are capable! With application of the key concepts provided in this book and continued diligent study and practice, sooner or later the number and seriousness of such errors will diminish, and your playing strength will then make the quantum leap upward that your new found strategic insights justify.

Now let’s try some problems to see how well you’ve mastered the Sector Line concept.

Click Here To Go To
Chapter 5 Problems

Click Here To Move On To Chapter 6

Click Here To Return To Table Of Contents

Click Here To Return To Milt's Go Page

Click Here To Email Your Comments/Suggestions To Milton N. Bradley