Improve Fast In Go

© Milton N. Bradley 2008


Chapter 6 - S.W.O.T. Analysis


The themes we’ve explored in this book thus far provided the what, where, when and why of fighting. This chapter integrates those ideas and reaches their logical culmination in a technique widely applied in business management, known by its acronym of SWOT analysis, which enables the establishment of a rational and appropriate action plan.

In Go, SWOT analysis begins with a global board evaluation of the importance and relative strength of the opposing groups prior to each move, just as we’ve done in the preceding chapters. Then we add to that an appraisal of our own aggressive potential, together with the converse appraisal of where the opponent can do us damage. The result is a global evaluation of each side’s:

   S = Strengths
   W = Weaknesses
   O = Opportunities
   T = Threats

This basic analysis is then augmented with an appraisal of how each side stands in terms of:
   - Settled territory.
   - Territorial potential.

The combination of these factors then allows the creation of an appropriate action plan, specifying (to the extent feasible):
   - The main focus of play in the current position.
   - The most urgent immediate task for the player with Sente.
   - What (s)he should do to achieve that goal.
   - The opponent’s expected response.


When properly completed and updated move-by-move, this global assessment and action plan provides the road map that guides both sides throughout the game!

CAUTION! Even if the SWOT analysis is perfectly performed (no mean feat in many positions for less than strong players), finding the best moves to exploit that appraisal will frequently require both tactical and strategic skill well beyond players at the level for which this book is intended. But please don’t be discouraged by this, because it’s only a technical detail which will eventually be self correcting as your knowledge and skill improve with increasing experience.

Until that high level of competence is finally attained, the result of applying a SWOT analysis may “only” be that you identify the right objectives, even if you don’t always find the very best moves to implement them! So, at worst, any resulting lack of success won’t be because you overlooked some important element of the position!

    Now let’s revisit the position we examined earlier in Chapter 2, Diagram 2, and see how the more comprehensive SWOT analysis enables sharpening focus beyond the simple (but essential!) identification of strong and weak stones to produce an appropriate action plan.

  Diagram 1 The SWOT analysis of this position is as follows:
Black:
Strengths:
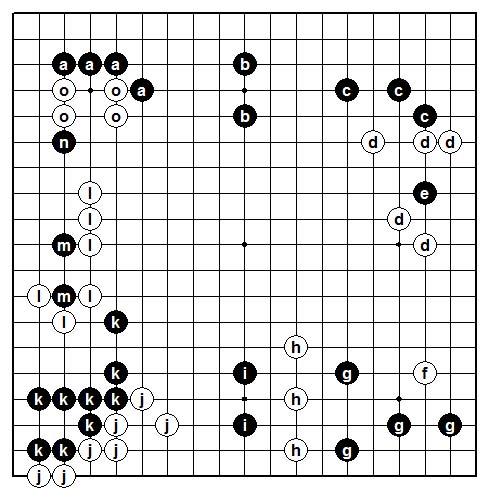
   - The upper side is very strong, but the “b” stones don’t reach out very far into the vital center, so their overall impact is only modest.
   - The “k” stones already have one eye and potential for another both on the edge and in the center, so they may be considered modestly strong.
Weaknesses:
   - The “i” stones have no eyes and are pressed on both sides by Whites which are stronger.
Opportunities:
   - The (modest) chance to exploit the weakness of the White “h” stones.
   - The (even more modest) possibility of rescuing the trapped “e” stone.
   - The chance to attack and possibly capture the White “f” stone.
   - The potential for attacking the White “j” stones which still have only 1 eye.
Threats:
   - The still unsettled status of the fairly large “k” group.
   - The weakness of the “i” group, sandwiched between the stronger White “h” and “j” groups.
Settled Territory:
   - 10+ points in the upper left corner.

Territorial Potential:
   - Almost, but not yet complete control of the entire upper side (because of the gaps between the “a”, “b”, and “c” groups, and the still open 3-3 point in the upper right corner.) which could easily total 50+ points if fully realized.
   - 10+ points in the lower right corner.
White:
Strengths:
   - Because of the trapped Black “e” stone, the White “d” group is very strong, and has great influence in the vital open board center.
   - Because of the trapped Black “m”and "n” stones, the White “l”/”o” group is equally strong, and also has great influence in the vital open board center.
   - The presence of both of these strong groups on opposite sides of the still open center greatly improves the fighting prospects of White’s still somewhat weak “h” stones. Weaknesses:
   - The fairly large “j” group as yet has only 1 sure eye.
   - The White “h” stones as yet have no eyes are squeezed on both sides by Black.
Opportunities:
   - There is good potential to invade and reduce the still porous big Black upper side, either between the “a” and “b” stones, between the “b” and “c” stones, or on the 3-3 point in the upper right corner.
   - There is also good potential to make territory between the “f” stone and the “d” group.
   - There is also modest potential to expand the left and right side groups into the center.
Threats:
   - Mainly that either of the still unsettled “h” and “j” stones will either be captured or will lead to disaster elsewhere if they are forced to run.
Settled Territory:
   - Essentially none at present.
Territorial potential:
   - 20+ points on the left side.
   - Perhaps 15+ or so points in the “d” group.
Action Plan:
   - The current global focus is on the interplay between the weak “h”,“i”, “j”, and “k” groups.

Now let’s see how this simple but surprisingly powerful SWOT protocol was applied in a game between two 4D players.

  Figure 1 The SWOT analysis of this position is as follows:

Black:
Strengths:

   - A still quite incomplete lower left corner enclosure.
   - Good shape in the upper left corner that should allow making two eyes against any currently foreseeable attack.
   - A fairly thick and almost connected right side, with one almost abandoned embedded White stone (W14) and one weak White stone (W26), both within Black’s Sector Lines.

Weaknesses:
   - The “thin”Black lower left side position.

Opportunities:
   - The chance to exploit the weakness of W6 on the left, and W14 and W26 on the right.
   - The possibility for invasion into the big gap between W12 and 24 on the upper side.
   - The Aji of the gap between W18 and 24.
   - The potential for expansion from the lower left corner, especially along the lower side.

Threats:
   - The potential inherent in White’s possible development of W6 on the left and W14 and 26 on the right.

Settled Territory:
   - Essentially none.

Territorial Potential:
   - A few points in the upper left.
   - Ten to 15 points in the lower left.
   - Perhaps 30 or 40 points on the right side, if the problem of W14 and (especially) W26 can be solved.

White:
Strengths:

   - A solid, shapely position in the upper left corner.
   - Solid and well coordinated positions in the upper and lower right corners.

Weaknesses:
   - W6 is a lone White stone splitting two Black positions and within distant Black Sector Lines. But that’s not urgent at the moment, because the area is too open for a Black attack to seriously compromise the ability of the W6 to make a base and/or escape.
   - W14, which abuts a strong Black wall and is also nearly surrounded, so it’s clearly at least temporarily abandoned.
   - W26, although at the moment it’s easily able to escape. The problem with this stone is that it must be aided before Black can play again to block its easy egress to the still open center, and then capture it create a vast Black territory.
   - The gap between W18 and 24, and between W12 and 24.

Opportunities:
   - Primarily to develop W26 to prevent a large local Black territory.
   - The chance to develop on the lower side.
   - The chance to consolidate the upper side by adding a stone between W12 and 24.

Threats:
   - Mainly that W26 will be trapped and captured, and that Black will make too large a territory in that area as a result.

Settled Territory:
   - Essentially none at present.

Territorial potential:
   - Ten plus points in the lower right corner.
   - Probably 10 or so points on the upper left side, and in the upper right corner.

Action Plan:
   - The current global focus is on the weak W26, and the way in which both sides handle that problem will shape much of the remainder of this game!
   - Because the center is still so open, White does not have to support W26 immediately, but he must watch the local situation carefully! So at the moment White can afford to improve his prospects elsewhere, with the lower left as the currently most fruitful target.


The following material may be glossed over at the reader’s discretion.


The optimal implementation of a SWOT analysis is mainly a matter of technique, and is therefore outside the realm of our focus on the analysis itself. But briefly showing how the fairly strong protagonists in this game answered this challenge may prove illuminating to the reader, so we show that next, with minimal commentary.


  Figure 2 W32 induced B33 to defend the corner territory, and then W34 not only made a base but threatened to more or less complete a large moyo on the lower side by continuing at “a” or thereabouts at an appropriate later time.

When B35 strengthened Black’s upper border, it would normally induce W“b” in response to preclude Black’s strong pressing move there. But in this situation the threat it posed against W14 and 26 on the right side is far more serious, so White felt compelled to respond to that instead!

W36 follows the maxim of attaching for defense (see Chapter 1), and after the natural Hane of B37 in response, the cross cut of W38 is a standard technique to “make shape”.

But after the atari of B39, W40, B41, instead of playing W42 White might have been better advised to simply play W“c”, B45, and then skip out lightly (and relatively safely) into the center with W“d”. But because White was also looking at the weakness of the Black lower right side group ...

The sequence shown followed through W52, after which Black has succeeded in the first stage of his strategy by inducing White to develop the weak and isolated W26 into a group too large to give up, but which is nevertheless still ripe for attack!


  Figure 3 After W52 White was out of Black’s Sector Lines, so there was no good way for Black to immediately exploit that still unsettled White center group. So Black’s attention shifted to White’s threat to close off a big lower side moyo, and for this purpose the invasion of B53 was an excellent way to start!

In this situation, the instinct of the typical beginner/intermediate would be to immediately aim next at the potentially vulnerable W32-34 two point third line skip in the lower left, but Black’s sophisticated plan is much deeper than that!

Black’s clever idea is to use B53 et seq as a diversionary mechanism for creating thickness in that area, with which to then:
    - support any weaknesses in his own lower right side group, and
    - prevent a later flight to safety in that direction by the weak White center group!

After accomplishing those objectives, Black also emerged with Sente because W78 was necessary to secure White’s eyespace and territory in the lower right corner. So Black was free to implement his plan with the cap of B79, blocking the flight of the now large and still eyeless right center White string, once again enclosing it in Black Sector Lines, and forcing it to seek safety above.

What happened after that was primarily tactical and therefore beyond our current interest, but suffice it to say that after a tense and incisive battle the embattled White center group was unable to either make 2 eyes or escape, so White resigned.

This is an almost perfect illustration of the danger that often follows when the Sector Line indications are ignored and a weak group (W26) is belatedly added to in an attempt to save it!

Black’s final favorable result in this game depended upon his ability to produce the precise tactics needed to counter White’s many serious escape and counterattacking threats, so it was by no means assured after B79. But whether or not it was, the key idea to remember is that it’s best to not become enclosed and forced into the kind of desperate situation White confronted here.


End of material to be glossed.


Click Here To Go To
Chapter 6 Problems

Click Here To Move On To Chapter 7

Click Here To Return To Table Of Contents

Click Here To Return To Milt's Go Page

Click Here To Email Your Comments/Suggestions To Milton N. Bradley