how to play Go
© 2007 Milton N. Bradley
If you've gotten this far in my web page it's reasonable to assume that your interest in Go has been kindled, but perhaps not yet to the point of making Go a permanent part of your future life - something that probably will only occur after you've actually begun to play and have experienced its exquisite pleasures and fascination first hand. Until that desirable moment arrives, you will be able to obtain at least a preliminary idea of what delights await you from reviewing the illustrative game presented below.
Go is most often compared with chess in our society because that has been long considered the western world's standard of strategic depth and complexity, and I, too, follow that model in this web page. But Go is startlingly different from chess because it is a game of accretion rather than of depletion - beginning with the board empty and then filling up rather than the converse. And in Go the playing implements (called stones) are placed on the board intersections instead of the squares and never move thereafter, although they may be captured and removed from the board. Part of the mystery of Go is that it would seem that this lack of physical movement should produce a slow, static game, but in reality the exact converse is true, and a well played Go game has a powerful feeling of cut-and-thrust!
Another major difference between Go and such games as chess and checkers is that the latter produce a "winner take all" result, whereas Go is really a game of "market share" in which it is only necessary to outscore the opponent by a single point in order to win!
To ease your understanding, I now provide a brief introduction to some of the fundamental ideas of Go. Please understand that this exposition is not intended to be either complete or definitive, so that it may therefore leave some unanswered questions in the minds of some readers. A much more complete exposition is provided by my primer GO FOR KIDS, while the on line presentations of other authors are spelled out in some detail in the web pages referenced at the end of this section.
We begin with a few key definitions:
Unit = Any number of adjoining stones of the same color which are solidly connected by board lines.
Diagonally adjacent units are not connected!
All The Stones In a Unit Live Or Die Together Indivisibly.
Group = Any number of spatially related, cooperating units of a single color.
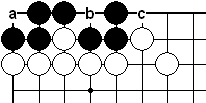
Units & Groups
The separate units in a group may later become connected to form a single unit, or permanently disconnected by the opponent to live or die independently.
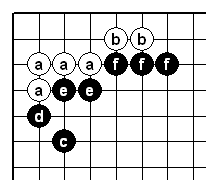
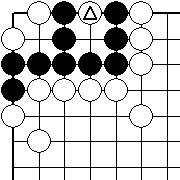
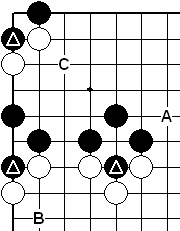
The White group consists of units marked "a" containing 4 stones, and "b" containing 2 stones. The Black group consists of units marked "c" and "d" of one stone each, "e" 2 stones, and "f" 3 stones.
Under normal circumstances neither of these groups is ever likely to be separated in subsequent play, although that's not impossible.
Liberty = An immediately adjacent unoccupied intersection to which a unit is connected by a board line.
 Liberties
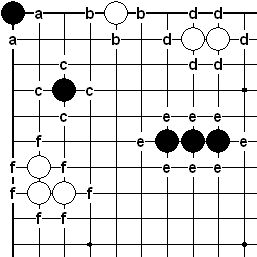
A single stone in the corner has only 2 liberties ("a"), one on the edge has 3 ("b"), and one in the center has 4 liberties ("c").
The White two stone unit has 6 liberties (marked "d"), and the 3 stone Black unit has 8 liberties (marked "e"), but
Although the White 3 stone unit also consists of 3 stones it only has 7 liberties (marked "f')! The difference between it and the Black "e" unit is its shape!
And that's a vitally important characteristic that strongly influences viability.
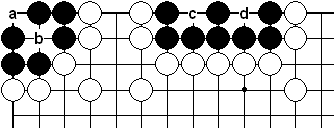
 Shared Liberties
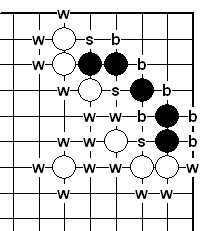
Liberties may be shared by stones of one color or by both, but each liberty only counts once for each unit that shares it.
- Liberties solely possessed/shared by White stones are marked "w".
- Liberties solely possessed/shared by Black stones are marked "b".
- Liberties shared by both Black and White stones are marked "s".
Eye = One or (sometimes) more unoccupied intersections entirely surrounded by stones of a single color.
 Eyes
Eyes
Eyes may contain one or more points. "a" and "b" are typical one point eyes, while "c" is a two-point eye.
Eyes may be real or false.
 False Eyes
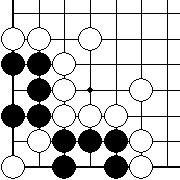
"a" is a real eye, but "b" is false because when "c" is filled by White it will be the last liberty for three Blacks!
Territory = The unoccupied intersections contained withn a safe group.
Safe Group = A group containing at least 2 separate and distinct real eyes.
Control of a given territory is achieved when the defender either already has or cannot be prevented from making 2 eyes, and any of the opponent's stones already inside that space or that may later be entered therein cannot either make their own 2 eyes or achieve Seki (a local stalemate).
Only safe groups take any territory.
 Minimal Safe Groups
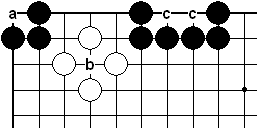
This shows two cases of the minimum possible territory within any group - the 2 eyes that make it safe ("a" and "b" on the left and "c" and "d" on the right.) There is no maximum except that imposed by the physical limitations of the board.
 A Safe Group
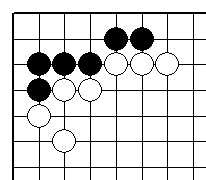
In this well known Joseki (analyzed sequence) position, the Black corner stones are safe and take a territory of approximately 10 points. (The exact final dimensions will be determined by later play around the borders.)
Any open space bordered by safe stones of both colors is neutral, and doesn’t count as territory for either side.
Seki = A local stalemate in which opposing groups with less than 2 eyes are nevertheless mutually safe from capture.
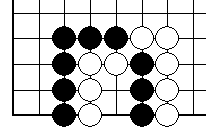 Seki - Neither Side Has An Eye
The key to Seki is the 2 shared liberties, on which neither side can play without putting itself into atari.
The reason that neither side in a Seki can afford to put itself in atari by approaching the other is that when the opponent captures those stones it would be provided with a live (two eyed) shape.
But if the capture does not provide a live shape, it is feasible to sacrifice your own stones and then play back on the opponent's key eyemaking point(s) to kill his group!
 Seki - Both Sides Have an Eye
In this position, Black may capture the marked White stone to gain one point, without affecting the Seki.
 Seki - Only One Side Has An Eye
The Mechanics Of Play
- Go is a 2 player game, one side using the Black stones, the other the White.
Go stones are lenticular disks, about 5/8 inch in diameter and from about 6 to 10 mm. thick.
The stronger player traditionally plays White, and equal players alternate colors in successive games.
- Black plays first.
Since this confers a sufficient advantage to insure a Black victory against an equal opponent, to equalize each player's winning probability a number of points (called Komi) is added to White's final score. In our sample game, Komi was a higher than usual 8 points.
- The 19 x 19 line board starts empty
Exception: In handicap games, Black's handicap stones constitute his first move.
- A move consists of entering one stone from the player's supply upon any unoccupied board intersection in accord with the 2 rules of Go stated below. (Each player always has as many stones as needed to finish the game.)
- If a move fills the last liberty of any opposing stones, all of those stones are Captured and immediately removed from the board by the capturing player.
This means that a player may enter a stone on a point at which it appears to have no liberties IF that stone captures some opposing stones, because the removal of those captives from the board will produce the required liberties.
- The opponent may not respond until that removal is completed.
 Atari And Capture Of A Single Stone
A - Atari, B - Capture, C - Result.
A player who has a unit "in atari" is not required to protect it, nor is the opponent ever required to capture.
Stones may remain "in atari" indefinitely!
 Multiple Stone Capture
A - Atari, B - Capture, C - Result.
- The captives are held as prisoners by the capturing player, and after the game's end are filled back into territories of the same color, thereby subtracting from the opponent's score.
Each captive is worth 2 points - one point for the open intersection exposed when it is removed from the board, and a second point when it is filled into the opponent's territory to count the score after the game has ended.
The result is that a capture can sometimes be quite productive on a direct point basis, but that should not deceive you into making capture a major objective!
If the opponent errs and an important capture can be made without significant offsetting detriment you should, of course, accept that gift, but in most cases capture is best only threatened, as the mechanism for achieving more important strategic objectives. Remember that, especially in the early stages of the game, there's usually far more territory available to be enclosed than stones to be captured!
- There are no mandatory moves in Go (unlike the response to check in chess), so the opponents are always free to play anywhere that they wish in accord with the rules.
- At each turn, a player may chose to enter a stone or pass. (In practice, no one ever passes unless they have decided that there is no way to improve their position.)
- When both players pass in succession, the game ends, prisoners are filled in, and the score is counted. (This process is performed automatically by the on-line Go servers.)
- There are no draws in Go. If the final score (including Komi) of both sides is the same, White wins!
- Tournament games are invariably played with clocks (essentially identical to chess clocks, although the time limits used are quite different.)
Games may be won (and lost) in 3 ways:
normally, by final count, or
abnormally, either by
resignation, or
overstepping the time limits.
The objective of a game of Go: To gain control of more territory than the opponent.
In keeping with Go's ancient heritage this objective is extremely simple, although achieving that goal can become staggeringly complex and difficult in the face of intelligent opposition. And that's why Go is so intriguing!
Although at least some direct acquisition of territory will always occur, for the most part in high level games such efforts usually serve only as the substrate upon which the major battles which actually decide the outcome are fought! So the key to making the appropriate strategic decisions in Go lies in understanding that its fundamental nature is conflict!
One of the more common major strategems is for one player to threaten to enclose a sufficiently large territory that, if it can be consolidated, will give that player an insurmountable lead! That, in turn, leaves the opponent with no viable alternative but to immediately act to try to prevent that consolidation before it can be completed, by either invading deeply and trying to make his own live group in its midst, or by "nibbling at the margins" to reduce the territory sufficiently that his own acquisitions can match or exceed it. The resulting battles frequently spill over into adoining board areas, and almost invariably decide the game's outcome.
There are only two simple rules that govern all play in the game of Go:
Rule 1. To remain on the board, every unit must possess at least one liberty.
Each Unit Shares The Sum Of The Liberties Possessed By Its Individual Members, But Each Liberty Counts Only Once For The Unit, No Matter How Many Stones Share It.
(This means that stones inside a large unit need not be themselves directly connected to a liberty if any of their friends on the outside edge have a liberty!)
A non-obvious but absolutely critical implication of this simple basic rule actually dominates much of actual Go play: In order to be certain that they always have at least the one liberty necessary for them to remain on the board, each discrete group of stones must completely enclose two separate liberties on which the opponent can never play!! (And that's why 2 separate and distinct eyes are necessary for safety!)
Rule 2. No full-board position may be repeated.
Local positions not only can but often do repeat, in the pattern called Ko (="eternity").
 Ko
Ko
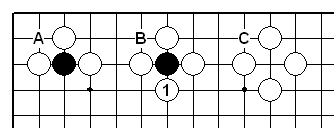
This diagram shows the 3 conceptually identical forms that Ko can take.
- A is the basic form of Ko.
- B shows the Ko cut off by the edge of the board.
- C results when the Ko is moved into the corner.
When White captures the marked Black stone, White's capturing stone will itself be in atari! But the "No Repetition Rule" requires that Black must first make a move elsewhere before a legal recapture is allowed! If that recapture is important, it means that Black must find a threat elsewhere (a "Ko threat") important enough to White to compel his reply there. Then Black is permitted to recapture the Ko, and now it will be White who must find a Ko threat to compel Black's response so that he can recapture the Ko. And this series of threat, response, capture, and threat will often continue for many moves and frequently becomes decisive in determining the game's outcome - either as a direct result of which side "wins the Ko", or not infrequently as a result of what happens elsewhere as a result of the Ko threats and the way that they were answered.
Because a Ko involves the capture and recapture of only a single stone, taken out of context it appears trivial, but in actual play it's anything but! A Ko will be created and fought only when its result will determine the fate of one or more significant groups of stones, because of the confirmation (or killing) of a needed eye, or the establishment or severing of an important connection. It is therefore unquestionably the single most important tactic in Go!
Ko typically occurs at least once in almost every game and several times in most, but the fighting of a Ko may not even begin until many, many moves after it's established, and its resolution is frequently not defined until after a long series of Ko threats, responses and counter threats has been fought.
Ko is the primary situation in which "The No Repetition Rule" is expressed, but far from the only one. Even when considering only Ko itself there are strange and interesting variants like double and triple Ko with and without outside dame. And there are also even more unusual non-Ko repetitive positions like Chosei and "Eternal Life". But because most of these other repetitive patterns occur only infrequently, it's possible to play Go on a quite sophisticated level with little more than a realization that such things exist. For that reason you can make their acquaintance whenever you feel ready and inclined to do so.
Everything else about how to play Go (except for the mechanics of play, ending the game and counting the score) can be deduced from just these two simple rules .
Caution! The deceptively simply stated objective of Go conceals one of the most devilishly complex intellectual activities in all of human history! To understand how this can possibly be true, consider some other well known games with similarly simple appearing objectives:
- Golf: Just hit the ball into the cup in as few strokes as possible. (But how many can achieve par or less?)
- Tennis: Just be the last one to hit the ball over the net and into the opponent's court. (But how difficult this is to do successfully against a fast, hard hitting, fit opponent over 3 or 5 sets!)
- Chess: Just catch the opponent's King! (Difficulty/complexity too well established to require further comment or explanation.)
- Football (American): Just move the ball downfield and over the opponent's goal line. [But doing that successfully requires a good strategy (maximize your team's assets, minimize its defects, and exploit the opponent's), the right tactics (call the right plays), and execution (block, tackle, pass, etc.) . Spectacularly difficult to do against strong opposition.]
What's Involved In Playing Go
Playing Go requires the integration of these same three vital elements of strategy, tactics, and execution, and failure in any of them will make a favorable outcome impossible to achieve against competent opposition. But the level of complexity involved in Go is many orders of magnitude greater than in football, so playing Go well remains a challenge to the best and brightest even after a lifetime of play and study!
Much of the tension in playing Go results from the compromises and tradeoffs required in achieving the simply stated objective of enclosing and securing territory. Although some direct attempts to sketch out and secure territory are both natural and necessary, in high level play that's only a sub text. The major thrust of play usually devolves about the identification of potentially weak groups on both sides, followed by their subsequent attack and defense, during which the final shapes of each side's territories actually become defined. If a player tries to be overly conservative and either initially loosely encloses too small a territory or consolidates what he has sketched out too soon, the opponent will be presented with the opportunity to gain dominance over a larger area elsewhere. But if too large an area is loosely sketched out initially or if it is not consolidated in timely enough fashion, the opponent may either separate (and sometimes kill) some of its stones, reduce it substantially, or even play within its confines to make a small territory of his own there, effectively wiping it out almost completely. And, of course, if any mistakes in the fighting occur, that not infrequently leads to instant resignation when a key group dies. So what primarily distinguishes the best players from the merely mediocre is the quality and execution of the delicate and precise positional and tactical judgments and timing that motivate these moves.
The initiative (Sente) is the "natural birthright" of Black at the outset by virtue of his moving first, and if this initiative could be maintained throughout the entire game White would have no chance at all to win. But it cannot! As a natural consequence of the normal interactions which inevitably occur in every Go game, each player will of necessity from time to time have to make moves which are primarily defensive (of stones and/or territory), so Sente naturally switches back and forth. And of course if either player makes even a small error which the opponent is alert enough to exploit, Sente can switch sides even in situations in which it normally would otherwise not. In the final analysis, other things being equal and major blunders excepted, the side which retains Sente for the greater proportion of the game will usually win! In the illustrative game presented below the key to Black's victory is his early seizure of Sente, followed by its relentless maintenance throughout a long series of subsequent moves.
The opening of a game of Go is its most difficult phase because these early moves not only provide its unique structure but also influence the feasibility of everything that follows. For that reason the most detailed explanations will be provided for these early moves, and then we will sketch more and more broadly as the game develops and becomes intensely tactical. Especially during the Fuseki (full board opening) but throughout the game as well, the immensity of the decision making problem confronting the players arises from the need to trade off conflicting objectives (e.g. territory vs. "influence", attack vs. defense, etc.) coupled with the need for efficiency (getting "the maximum bang per buck" for each stone played). And of course, each player is not only trying to achieve his own objectives but is also trying to frustrate his opponent! So the decisions on how to best proceed at each turn are surpassingly difficult! And even the "detailed" explanations provided herein are therefore necessarily much simplified.
It is easy to see that making eyes and sealing off territory are easiest to accomplish in the corners because there the board edges form natural barriers to enemy incursion in two directions. So the corners are the "theoretically correct" places to begin the game - and in fact that's what occurs in this and most other Go games. But the reader should be aware that it is feasible to utilize a more subtle, indirect approach, starting instead with center moves which have no immediate territorial implications, but which offer fighting "potential" instead whose later proper exploitation is expected to produce at least an equivalent amount of territory. The problem with such an indirect strategy is that it places an increased premium on proper followup else the final return from these initial moves may be insufficient, because in the final analysis only the balance of territory at game's end counts! So such an initial center strategy has historically quite rarely been used, although more experimentation with it is being seen recently.
Over the many millennia that Go has been played, the best locations for initial corner moves have been fully developed, resulting in simple patterns for uncontested corner enclosures (= Shimari) and far more complex ones when the corner is contested (= Joseki, each of which is fully comparable to a complete chess opening). Integral to this, the optimal distance from the board edges for these early moves has also been established, so if you check what follows you will see that none of the early moves in this game is any closer to the edge than the third line!
The Go board diagrams presented below utilize algebraic notation similar to that used in chess, since that makes it easier to refer to alternative moves without the necessity for creating a variation diagram. As in chess, these numbers and letters do not appear on the actual boards the players use, but can be (and usually are) displayed by the "clients" (software programs) used to play by computer on the internet, and of course appear in books and presentations like this one.
Illustrative Game
Because the protagonists in this game were top flight professionals, a complete understanding of the strategy and tactics displayed is far beyond the unaided ability of even the strongest amateur player - and I'm not even in that modestly exalted category. So even if it was my objective to do so, providing a detailed explanation of their subtle maneuvering would be infeasible. But that's not the objective here. Our much more basic intention is merely to sketch out the game's main strategic and tactical themes in broad terms that can be readily comprehended even by a rank beginner.
This game was contested between two professional Go players, Michael Redmond, 8 Dan (Black) and Yilun Yang ("rabcat"), 7 Dan (White), April 10, 1999 on the Internet Go server (IGS), in the second qualifying round of the 1999 North American Masters Championship Tournament (NAMT). These professionals are both the approximate Go equivalent of Grandmasters in chess so their level of play is exceptionally high, although neither is quite of world championship caliber (although there is not at present any such recognized title or individual in Go).
The explanations of the game moves provided are intended to illustrate the almost unbelievable beauty, strategic depth and mind-bogglingly complex tactics of Go in a manner comprehensible to persons who don't know more than its few simple rules of play. Although this would seem an impossible task, it is feasible because the unique qualities of Go are so self evident that even the complete neophyte will not only be able to follow the game's flow but appreciate it, albeit only on a very general level in which all of the more intricate strategic and tactical nuances are necessarily glossed over or omitted.
Hopefully, at least some of you readers to whom this represents a first look at Go will be kind enough to email me after you finish reviewing this game to let me know just how well or poorly I've succeeded in this daunting task! It would be most appreciated.
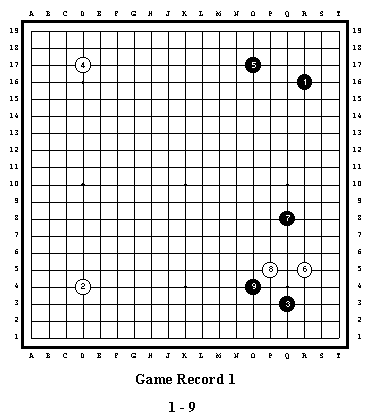 Game Record 1
B1-W4 are each played in an open corner, and this is the most usual way to begin. The exact point in the respective corners occupied by each stone is the result of a very careful analysis of their subtle interactions.
Once each corner has a stone in it, an important decision regarding the placement of B5 must be made. W2 is on the 4-4 point, so with it the Lower Left corner is temporarily "finished". But B5 could rationally be played at any of C15 or D15 in the Upper Left, Q5 or R5 in the Lower Right, or P16 or P17 in the Upper Right corner, each of which will produce a completely different game!
From a theoretical perspective, playing in the UR corner is slightly best for reasons we will discuss in a moment. But the decision between the chosen location at O17 and the alternatives of P17 and P16 is not so simple. As played, the Shimari formed by B1,5 exerts the strongest influence down the board toward B3 in the LR, and that is the reason it was chosen. But in return this positioning has the detriment that it encloses the UR corner more loosely than the more usual P17, leaving it more vulnerable to a possible later White invasion. On the other hand, it protects its left flank better than would P16. This kind of tradeoff is typical of Go and one of the things that makes playing it so very intriguing! Because, unless the opponent has made an absolute blunder which you are exploiting, every move has both assets and detriments - i.e. "There is no such thing as a free lunch". So the art of playing Go is to try to "Give a little, take a lot", and not be greedy.
W6 prevents a second Black Shimari, as expected, but then (in accord with his plan in playing B5), B7 combines an ideal extension from his Shimari in the UR corner with a Joseki squeeze play in the LR corner! And this is a considerable advantage for Black, as it should be if he has played correctly! Why?? Because at the moment Black has played one more stone than White and still retains Sente (the initiative) as his "birthright" from playing first - and that's the reason that White gets Komi (in this game, 8 points) added to his score at game's end!
Next, W8 and B9 are both popular Joseki moves. This means that the resulting division of the available assets (e.g. territory, influence) in this corner is dynamically (not statically) equal. The degree to which the selection of this particular Joseki was appropriate in the global context is one of the many factors that not only determine the future course of the game but which also strongly influence the prospects for each side, and constitutes one of the more important and difficult decisions to be made.
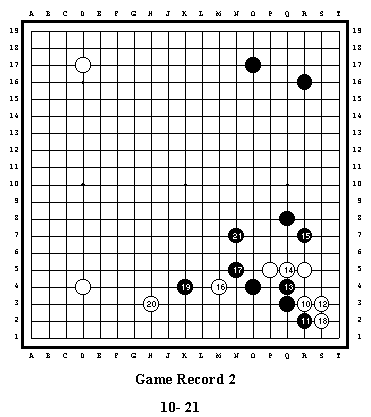 Game Record 2
W10 After B9, White is faced with a dilemma. If he plays at O5 Black will respond at N4, running along the 4 th line and getting too much potential territory along the LR edge as a result. But running out at P7 or O6 won't affect Black at all and will also leave White without sure eyes in this corner, so he decides to attach at the key 3-3 point to secure eyespace.
B11 reduces the liberty count of W10 and threatens to continue at S3, so W12 on this same point is forced. But this makes Q4 an ideal "shape" point for White, so B13 there is necessary. This in turn makes the threat of a Black play next at Q5 to split the white formation apart, so W14 on this same point is also forced. The result is that this sequence has formed an unusual but feasible Joseki pattern, after which White is virtually assured of making 2 eyes in this corner because he has S2 and S8 (to enlarge his space) as alternatives (miai).
Important: Contact via W10 was made here, but not with the intent of capturing opposing stones! Rather, its intent is to produce a shape capable of making 2 eyes if and when needed! Note also that B11 and W12 are the first moves on the second line, but this is acceptable because both are essential in this position for producing a shape capable of generating 2 eyes if needed! Now that both sides have at least temporarily achieved a local formation capable of making eyes or running away into the safety of the open center, further contact and attempts to capture locally come to a halt - to be resumed later only if and when required to assure the safety of the opposing stones!!!
So Black next played the totally unexpected and surprisingly strong B15 - a move that none of the many observers anticipated, but which after-the-fact everyone agreed was magnificent! Although this stone is quite close to B7 its shape is ideal, it inhibits White's expansion in this direction, and begins the process of turning the space between these 2 stones and the Black UR corner Shimari into a large potential territory (Moyo).
Since White's LR corner stones are quite safe for the moment, W16 combines an extension from White's LL corner stone with a squeeze play which inhibits the expansion of Black's LR corner stones to their left. Because this threatens to follow next at N6 to close Black in, B17 moves him smoothly out into the open center while slightly weakening W16.
Note: Black does NOT make contact with W16 because that would induce White to strengthen that still weak and potentially exploitable stone! (This is the exact converse of the beginner's mistaken instinctual behavior.)
After B17, White can still flee into the open center with O6 or P7, but, perhaps influenced by the slightly higher than usual 8 point Komi in this game, he opts instead to secure eyespace in the corner via W18, which threatens to make one eye immediately via playing at Q2 to catch B11.
Since saving B11 now would be both small and too localized, Black instead opts for B19, which squeezes W16. But instead of defending W16 directly, W20 strengthens it indirectly by counter-squeezing B19 with good coordination with White's LL corner stone, in the typical thrust-and-counter thrust of high level Go play!
 Game Record 3
B21 A simple, but surprisingly effective move! Not only makes perfect use of the subtle B15 to create a vast Black moyo on the Right side, but also locks-in the White LR corner stones and forces them to make eyes immediately.
W22-24 With the capture (and removal) of B11 White makes one eye immediately and with the easy prospect of making a second eye if and when needed becomes absolutely safe here, but because these moves have no other effect on the global position Black retains Sente with which to play elsewhere. (This is a key difference between high level and weak Go! Strong players make the globally largest move, often switching to a completely different board area, as here. Beginners tend to fixate upon a local situation and continue to play there long after the incremental value of the added moves has fallen far below that of potential alternative plays elsewhere.)
B25-31 With this Joseki sequence, both sides become locally stable, with White having virtually assured eyes and Black with good shape enclosing enough space and with center access to be not only also safe for the moment, but in better position to wage any future center fighting. At the same time, Black's position here is a lot less secure than White's, so the result is dynamically "equal" (as it must be in order for the sequence to be Joseki).
W32 For the first time in this game White finally has Sente, but in a position in which it is surpassingly difficult to see how best to proceed. White thought for a long time before making this play and it evidently was a compromise, but the result is that it is "neither fish nor fowl". He clearly couldn't decide upon the best place to invade Black's right side moyo, but this move seems too unfocussed to be truly effective even as a preparatory play for a following invasion. The result is that this was almost certainly the losing move, although proving that required all of the skills of a top professional on Black's part!
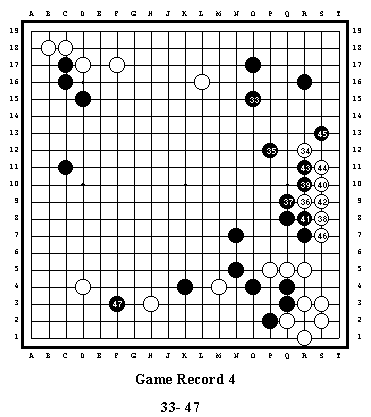 Game Record 4
B33 The natural way to expand/ virtually secure this corner, and the point at which one would logically have expected W32 to have been played if he wasn't confident of the result of a deeper invasion.
W34 Regrettably, something like this deep invasion is now necessary, because Black simply can't be allowed to consolidate all of his vast moyo here if White is to have any chance to win this game.
B35 Well played! If White was allowed to play here next the strange W32 would suddenly become a fine play, assuring that the White invaders can safely escape. So B35 quashes this possibility, and now White must "live small" on the edge.
W36-44 White struggles for eyespace, while Black builds outside strength while threatening to kill the invaders (recognizing that it's not really possible).
B45 Threatening to follow at S12 to isolate and catch W34. But if White plays there himself now, Black will play at S7, severely damaging the LR White corner territory as well as making it extremely difficult for the 7 White stones here to live, so W46 is forced!
B47 Another fine move by Michael Redmond! The logical followup in the UR would be to play this stone at S12 to create a substantial Black UR corner territory, but Black correctly sees that White can't afford to play there now to save W34 because he has no effective followup that's large enough to play at this still early stage of the game. So Black takes Sente again! It is non-obvious, subtle judgments like this that distinguish top players from ordinary ones, and which win games against really strong opponents.
 Game Record 5
W48 - B63 This is the sequence that sets the stage for all of the remainder of this game! White makes the logical decision to respond to the squeeze play of B47 by trying to connect his stones to make a live group locally, so (in accord with the Go principle "to defend, play close") with W48 he attaches to the Black K4 stone (B19).
But Black's clever response not only prevents White from becoming settled (assuring 2 eyes), but also makes a small Black territory in the LR. This forces White to flee for safety into the center with W58. But this makes a subtle threat of its own to continue at F7 to enclose the weak Black 3 stone group, so ...
With B59, not only have Black's own weak stones been led out into the center but White's LL corner has become vulnerable to invasion, so W60 is necessary to protect against this. Then B61 again threatens to invade, forcing W62. But this leaves black with Sente, so ....
The "capping" play of B63 once again threatens the life of the White stones below by blocking their easy center egress, maintaining Sente for Black. But because the 4 Black stones squeezed between the White groups here are also still unsettled this is a fair fight, in which victory will only be gained (if at all) by a continuing series of good moves and not by any one or two especially incisive plays!
From this point on, the game becomes intensely tactical, within the context of the major strategic motif of Black's attack on the unsettled white group and White's attempts to settle it or escape encirclement. Of course, within this broad framework other subsidiary strategic motifs are also invoked and played out, as each side attempts to enclose and secure territory in the attack/defense process. And other local battles are also initiated and carried on within this broad context as well, and this is typical of the complex interactions that make Go so intriguing.
The details of these many complex tactical threats, counter threats, and secondary strategic motifs are well beyond our present interest, so they will not be explored in any depth. But be advised that they are not only present but must be fully accounted for by the players if their moves are to be successful in the overall game context.
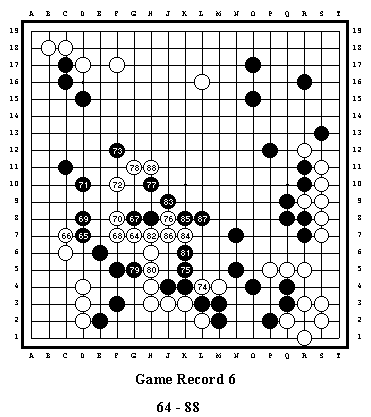 Game Record 6
W64-70 In a carefully calculated interplay of threat and counter threat, first White and then Black threaten to escape into the center and prevent the opponent from doing so.
B71 Safely completes Black's escape process, at least for the moment.
W72 White tries to duplicate Black's safe egress, but once again
B73 throws a roadblock in his path.
W74 Threatens to capture 2 Black stones, forcing the bad shape B75 to preserve them.
W76-88 In the subsequent play, the 2 White stones on L4, M4 are trapped and at least temporarily left behind in Black's grasp, while after more complex tactical cut-and-thrust with W88 the still eyeless White stones finally emerge into relatively open board area and temporary safety.
Overall, the current situation at this moment is as follows:
- White has about 15 points of solid territory in the LR, about the same in the LL, and perhaps 10 more in the UL.
- Black has about 15 points in the UR (and perhaps 25 if he can play at S12 before white does), perhaps 10 to 15 more in the UL (20-25 if he can play at B17 before White invades), and perhaps 10 in the Right Center.
So with Komi White is comfortably ahead in relatively secure territory at the moment. BUT, and
this is the key theme of this game, White has a large weak group for Black to exploit, and it is in
the process of cleverly harrying this group that Black intends to secure more territory and/or
perhaps even score a coup if White falters in his defense!!
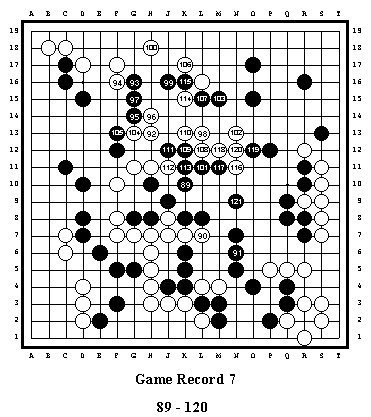
Game Record 7
In the process of trying to entrap the fleeing White group, Black must also be mindful of the safety of his own still unsettled stones, lest White trap some of them and thereby save his own. That's the primary meaning of B89, which prevents the potentially dangerous cut at K9.
As White struggles to escape and
connect to some of his already stable stones (like his UL corner), he also collaterally increases
his territory there via W96, 100, and 106. But the combination of B93, 99, 103, 107, and 115
keep White from making that highly desirable connection, and at the moment of the forced
W120 White is still confined and vulnerable. Finally, B121 essentially destroys White's potential
for making an eye in this area so he
is left seeking both of the still
elusive two eyes he needs to
survive.
 Game Record 8
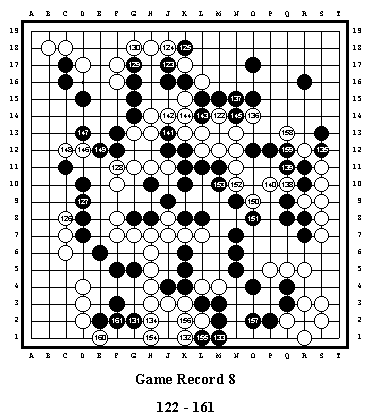
Throughout the remainder of this game, White struggles to attain safety by making the needed 2 eyes for his ever larger center group of stones, while Black tries to frustrate him at every turn.
The clever and incisive tactics involved must be meticulously calculated in advance by both players, because once embarked upon a particular line of play there is only rarely available a satisfactory fallback line if a miscalculation heads toward impending disaster!
The key finishing sequence in Black's attack begins with the "push through" of B141 followed by the cut of B143, but its success was only made possible by the non-obvious earlier response of the "solid connection" of B137 to the attachment of W136. This move was especially brilliant because the resulting inefficient shape of the string of 4 Black stones that it created would ordinarily be something to avoid, but in this case was actually best because after B143 it offered White no "wiggle room" here in which to create mischief. This is the kind of foresight and creative thinking that characterizes Go and distinguishes its better players.
After W156 White has one secure eye, but is still desperately short of prospects for making the needed second. Note especially how the 2 "abandoned" White stones on L4,M4 are still useful because they necessitate B157, giving White Sente with which to play W158. Much as Black dislikes having to play B157, if this stone was mistakenly omitted then a White play at N3 would capture 5 Blacks and save the entire beleaguered White group!
The clever W158 seems finally to offer the chance of making his needed second eye, but after B159 it is clear that Black will rescue his almost trapped 6 stones by capturing either the White stone on R12 (W34) or by escaping via attaching to W136 at P14, so this attempt fails. W160 is his last desperate attempt to cause complications, hoping for a Black response at F1. But when Black simply connects with B161 it is clear that White can neither capture the 4 Black stones nor connect out, so WHITE RESIGNS because with this failure to secure his needed second eye the entire vast White center group is dead!
Brilliantly played throughout by Michael Redmond, and exemplifying all of the attributes that make Go the greatest strategic board game in all of human history!
Go Playing Tutorials
If you're not "a games person" or if you're a teacher not interested in Go for its own sake but in how it can be used in teaching vital REASONING SKILLS to children, you might want to stop with just what you've learned so far and just enjoy the other material provided in the remainder of this web page. But if what you've seen of the depth and beauty of Go in this game has captured your imagination, thoroughly learning its rudiments is the next natural step.
A number of other Go enthusiasts have already produced their own versions of its basic ideas in pages on the web, so rather than "reinvent the wheel" here I shall merely reference the best of those efforts below. Although I do not find any one of these presentations fully satisfactory, in sum they do provide enough of the rudiments of Go to get a beginner started. Of course, much of this material necessarily repeats what you've already seen in my brief introduction above, but most go well beyond it so unless you are an especially "quick study" their perusal will prove well worth your time.
But be advised that even the best possible short introduction to a subject with the depth and complexity of Go can reasonably do little more than present its fundamental notions. Of necessity, any in-depth discussion of the three key elements of strategy, tactics, and execution must be left for a much later time at which the beginner has acquired sufficient background to begin to integrate and appreciate them. So please do not expect even the totality of these introductions to do much more than provide a few key insights and a basis for further study.
The few simple ideas presented in these introductions can be learned in a few minutes, even by young children, and all of Go's spectacular tactical magic and profound strategy can be (and actually were) derived from them and nothing more! It was just this modest amount of information (sans "the Ladder" and "Geta") that then World Chess Champion Emanuel Lasker had in 1907 (see How Go Came To America) when he played his first game of Go and immediately grasped its immense potential. And it is theoretically possible for anyone to not only begin to play Go but to become a strong player using no more formal instruction than this. But in practice, that would mean trying to learn from your own personal experience all of the tricky tactical nuances and profound strategic ideas that have been developed by hosts of superb players over the many centuries that Go has been played - clearly a daunting and ultimately infeasible task. Far easier and better to avail yourself of all the accumulated wisdom codified in the many excellent Go tutorial books now in print.
Unfortunately, IMHO none of the extant beginner's books, in common with the web page tutorials, is completely adequate, and my own complete and incisive introduction THE FIRST BOOK OF GO is now out-of-print. However, I'm pleased to announce that its derivative and successor, GO FOR KIDS, is scheduled for publication by Yutopian, a major publisher of Go books in English by summer 2000, as soon as its unique art work is completed. Although this book has been specifically designed to be "child friendly", it is distinctly not simplistic and can be profitably and pleasurably read by adults as well! Check with Yutopian for the latest information by clicking on their highlighted name above.
In reading the other author's web introductions to Go referenced below (which all basically cover the same material in slightly different fashion), please remember that they present only a few highlights of the most basic ideas, and that there not only is far, far more to Go but that most of the things that place it on a plane far above all other strategic board games can only be, at best, vaguely glimpsed from them. What they contain is perhaps analogous to learning simple arithmetic, with all of the immense power and application of advanced mathematics still to be discovered! But as Confucius said "The journey of 1000 miles begins with but a single step", so don't be afraid to begin. You'll never be sorry that you did!
Jan van der Steen's Introduction
The next introduction is especially recommended for children!
Click Here To Return To Milt's Go Page