|
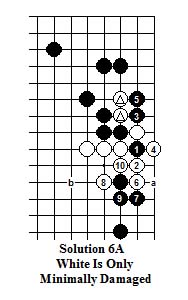
Solution 6 A There are twin cutting points on the second line available for Black to exploit. If B1 here, then the atari of W2 on the outside is to be expected. After the counter atari of B3, the capture of the sacrifice B1 by W4 is natural and necessary. Then B5 virtually assures the capture of the two marked Whites. After that, with the sequence thru W10 the bulk of White’s force is essentially safe because White not only has free access to the open center, but “a” or “b” are miai to secure two eyes. |
|
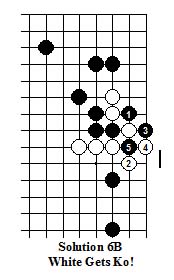
Solution 6 B Since that variation takes profit but doesn’t apply much pressure to White, Black will undoubtedly prefer to cut on the other side with this B1 instead.>br> Next, if W2 here, the atari of B3 is to be expected if Black has enough favorable Aji elsewhere on the board. Then W4 will induce the capture of B5 to create a big Ko. |
|
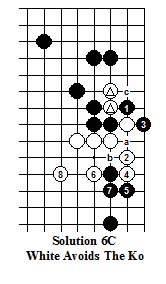
Solution 6 C But White need not become involved in that Ko fight if he prefers not to! Instead, with the sequence thru W8 shown here, he can move smoothly out into the open center with good shape, with the miai of “a” and “b” left behind to assure his connectivity to W2 and 4. And if and when the connection of W“a” gets played, B“c” will be necessary to assure that the two marked Whites remain Black’s captives. On balance, this would seem to be the preferred way for White to play, but... |
|
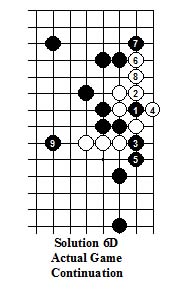
Solution 6 D In the actual game in which this position arose, White followed this variation instead, opting for the profit his live group took, and leaving for later the problem of what to do with his now classically weak 3 stone string after B9 capped it! Although B9 was both big and very threatening, the likely outcome of the center fight that will follow if White plays to save the 3 stones isn’t clear, so it’s hard to accurately evaluate which alternative Solution would ultimately have been globally best for both sides. |